BigQuery review: service interface, main advantages and disadvantages of the system

TABLE OF CONTENTS
Profit.Store

42
BigQuery is a cloud-based data warehouse that not only collects structured data from a variety of sources, but also enables in-depth analysis. In this way, BigQuery can be described as an analytical database designed to run queries and provide deep insight into data.
BigQuery effectively integrates the functionality of spreadsheets such as Google Sheets and the capabilities of database management systems such as MySQ.
Why you should use BigQuery
One of the key benefits of choosing BigQuery is its ability to handle analytical queries efficiently. BigQuery provides powerful capabilities for performing complex analytical queries on large amounts of data. "QUERY" in this context means performing data queries, which can include actions such as calculating, modifying, joining and other types of data manipulation.
Google Sheets has a QUERY feature that allows you to query data sets, which can be useful for creating a variety of reports and charts based on small to medium-sized data sets. However, no spreadsheet application, even a popular one like Excel, can efficiently handle huge data sets with millions of rows and perform complex queries on them. This is where BigQuery comes in, as it can handle such tasks.
BigQuery specialises in performing analytical queries that go beyond the basic CRUD (Create, Read, Update, Delete) operations. It is a high throughput tool for processing large amounts of data. However, BigQuery is not intended to be a universal solution for all database scenarios and is not a direct replacement for relational databases. It addresses specific big data analytics needs and should be used in conjunction with other tools and platforms for complete data management.
How to use Google BigQuery
Another compelling reason to consider BigQuery as a data solution is that it is a fully cloud-based service. This means you don't have to worry about installing and configuring any additional software. Google is responsible for managing the entire infrastructure, freeing you from maintenance worries. All you have to do is set up BigQuery.
BigQuery settings
The first step
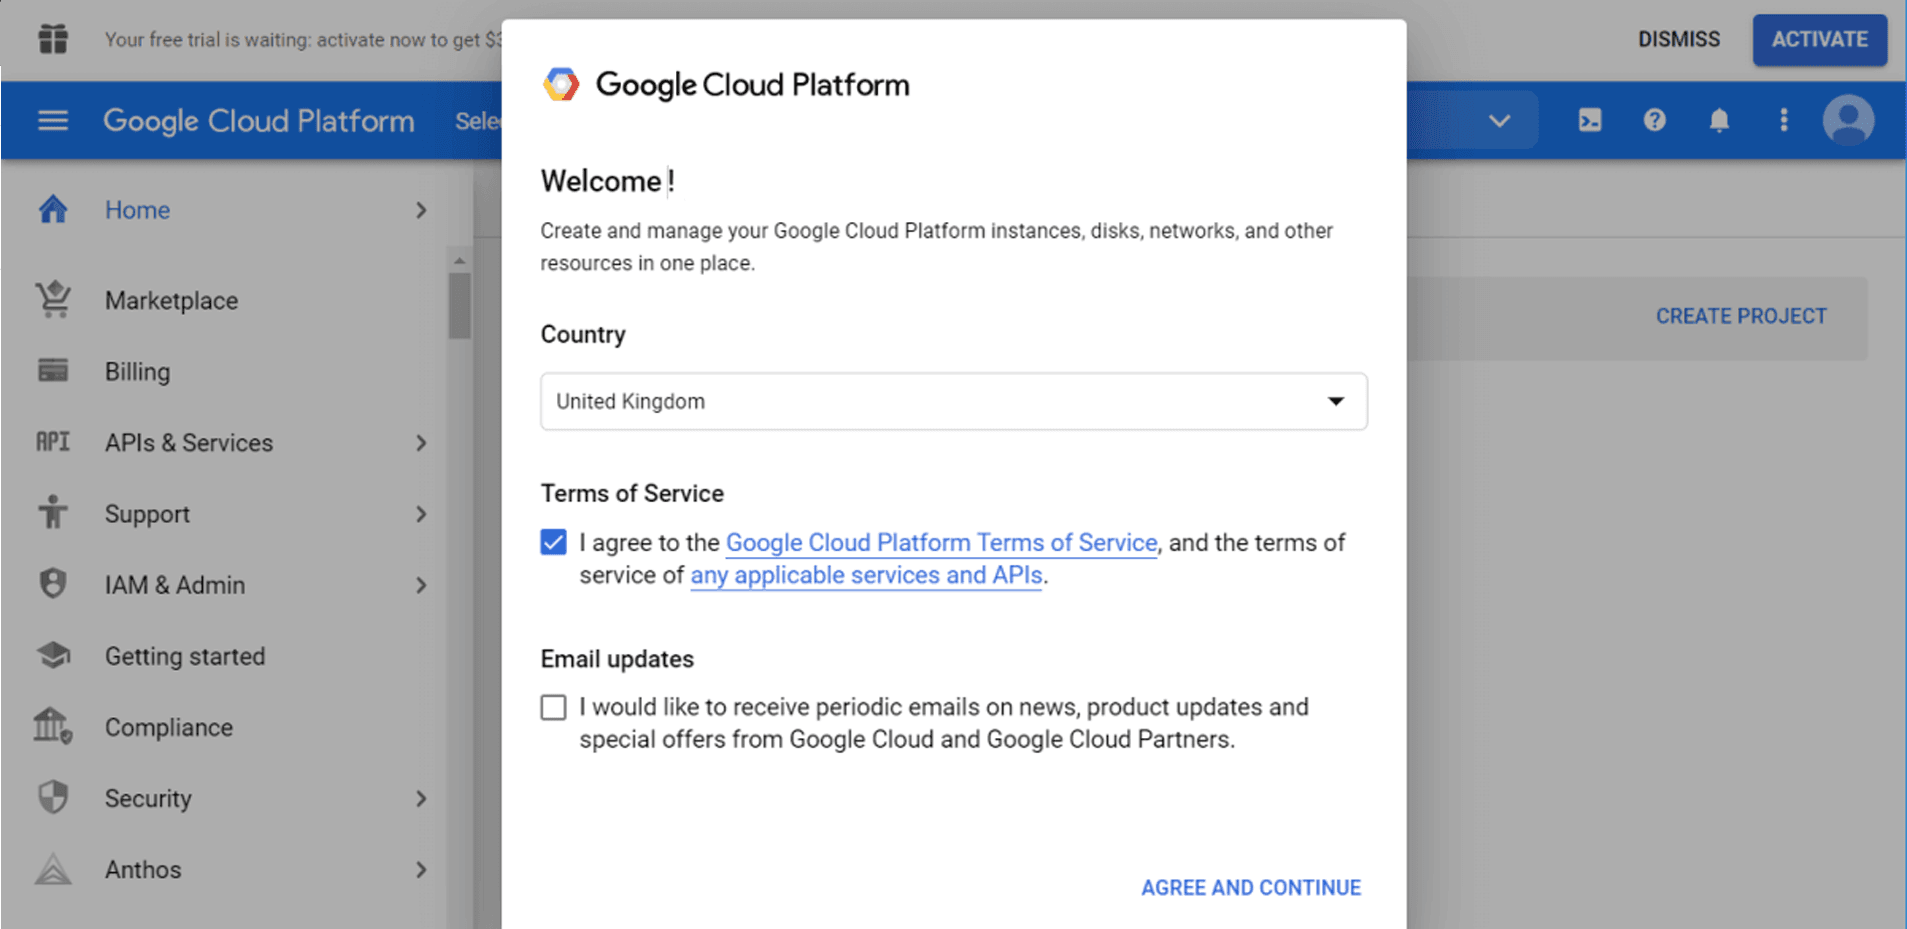
Let's start with Google Cloud Platform. You will need to select your country and agree to the Terms of Service.
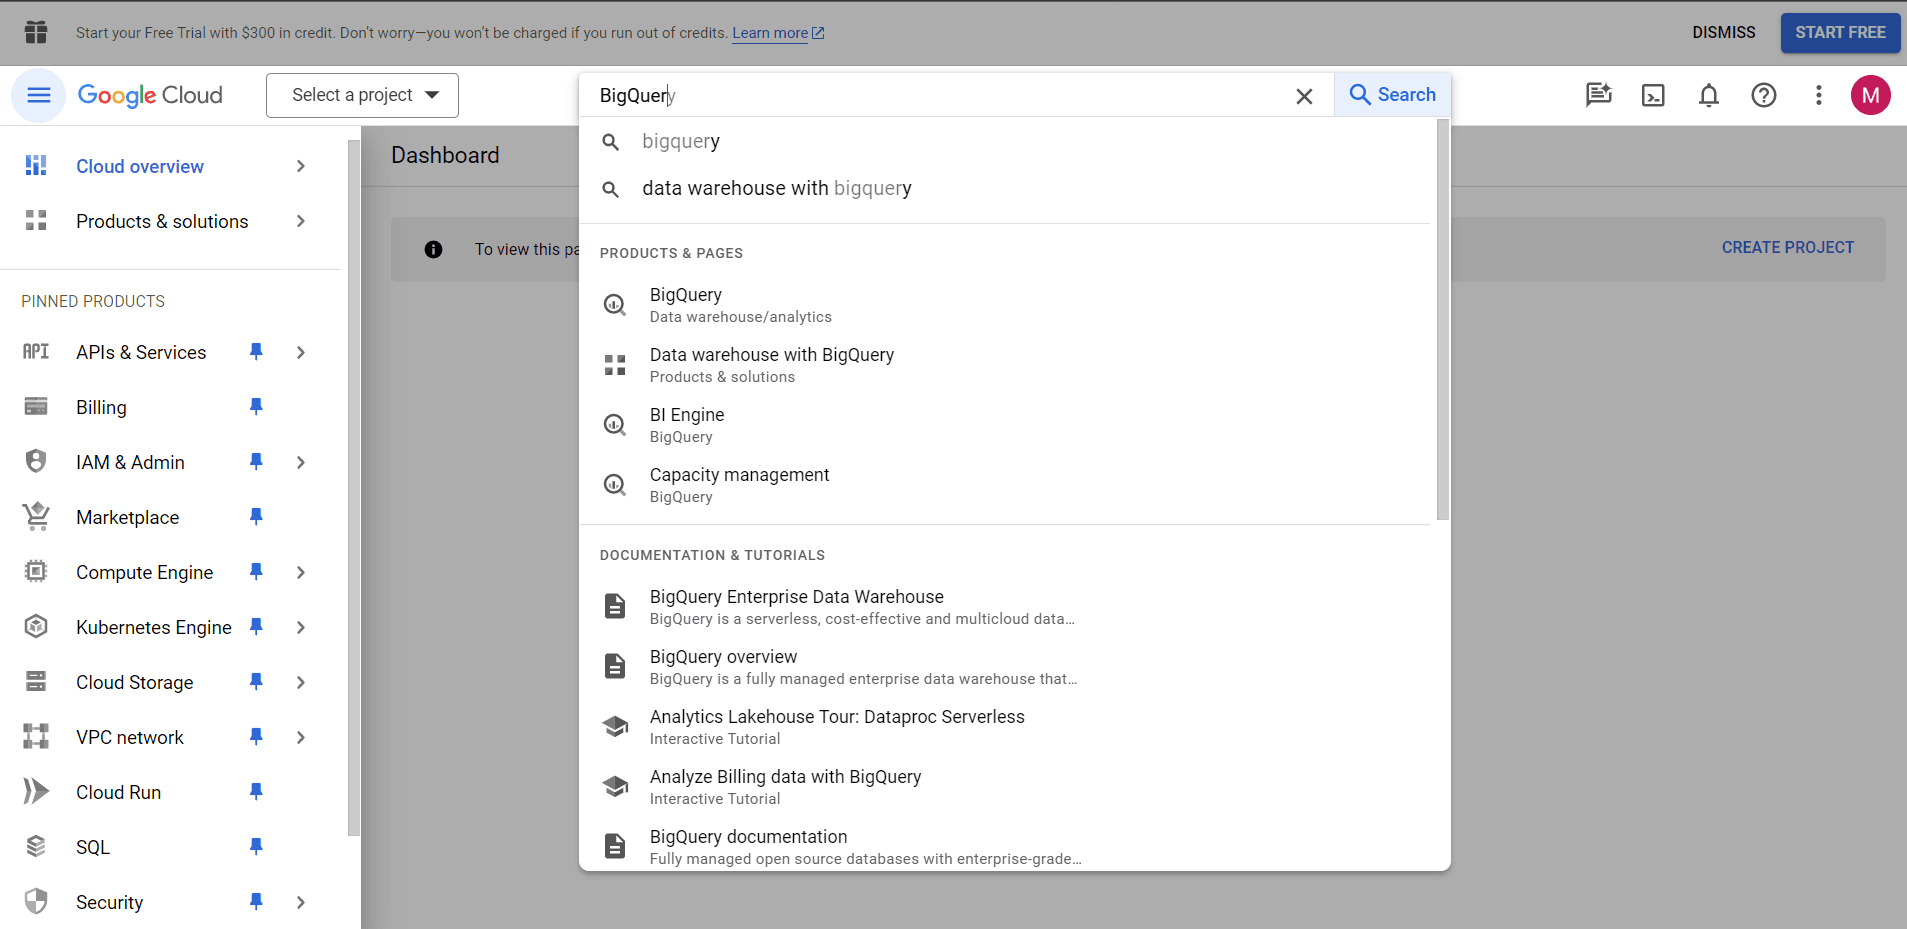
Then go to BigQuery - you can either use the search bar or find it manually in the menu on the left.
Creating a project
This is what BigQuery looks like the first time you visit it.
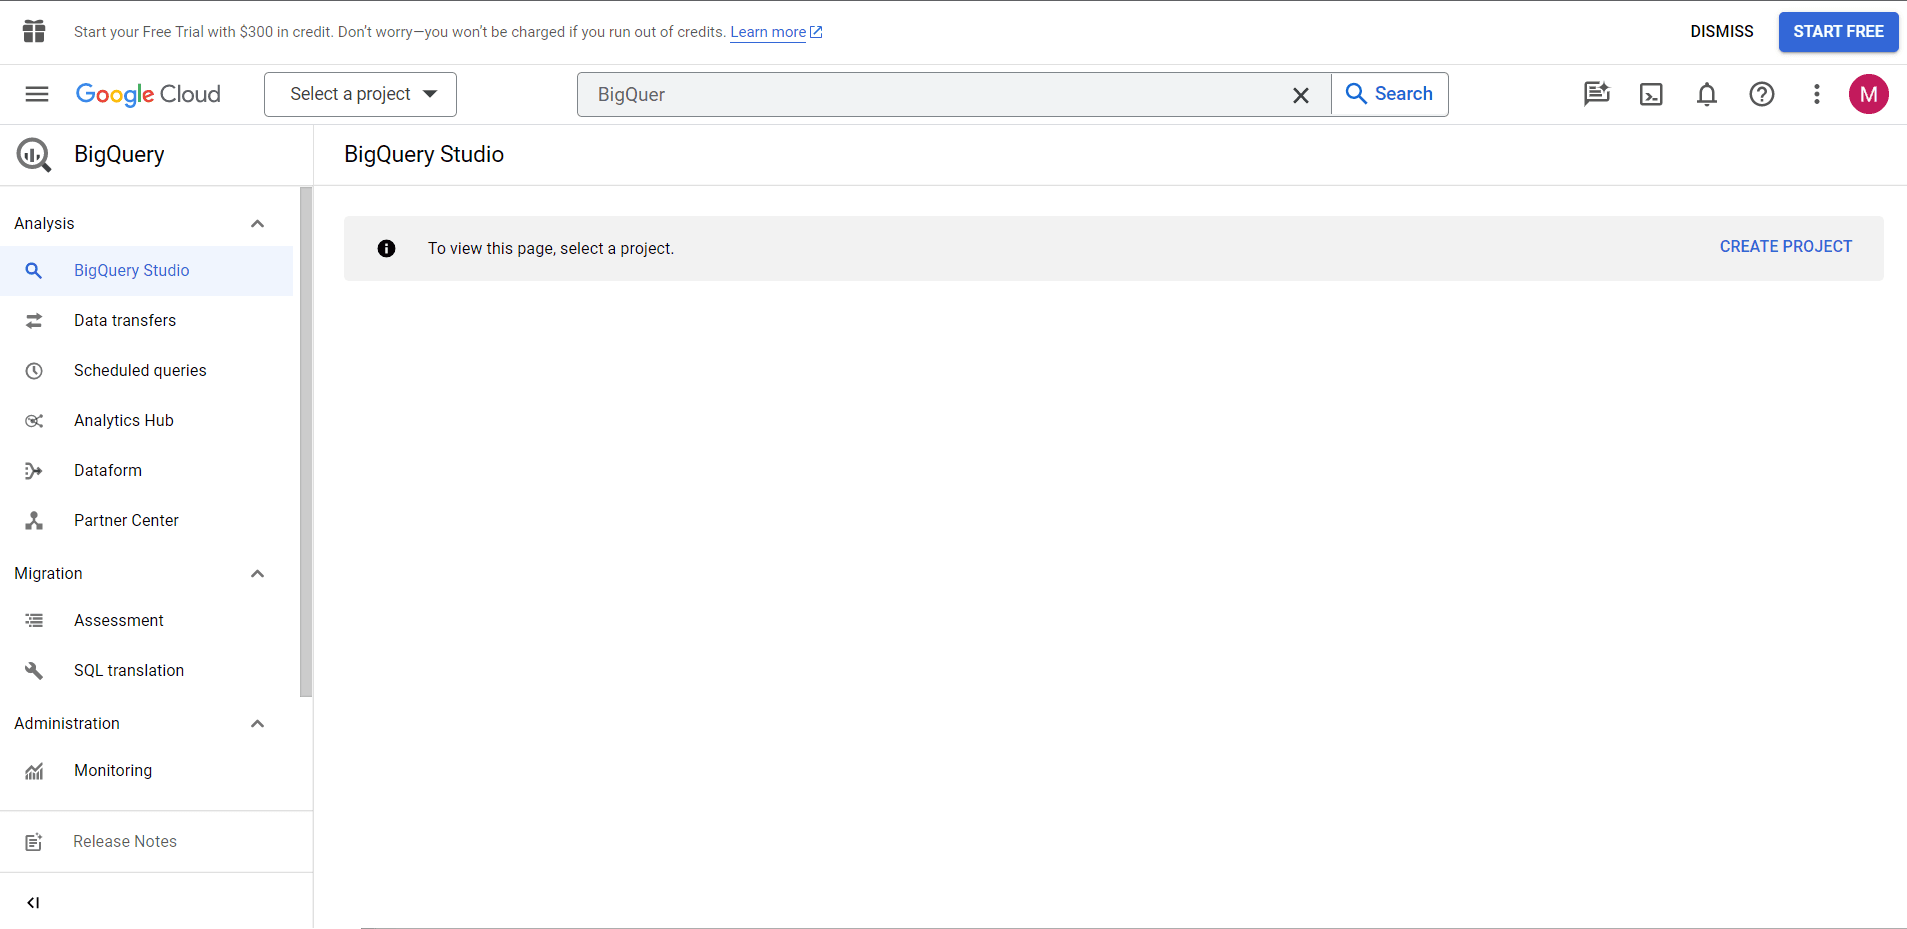
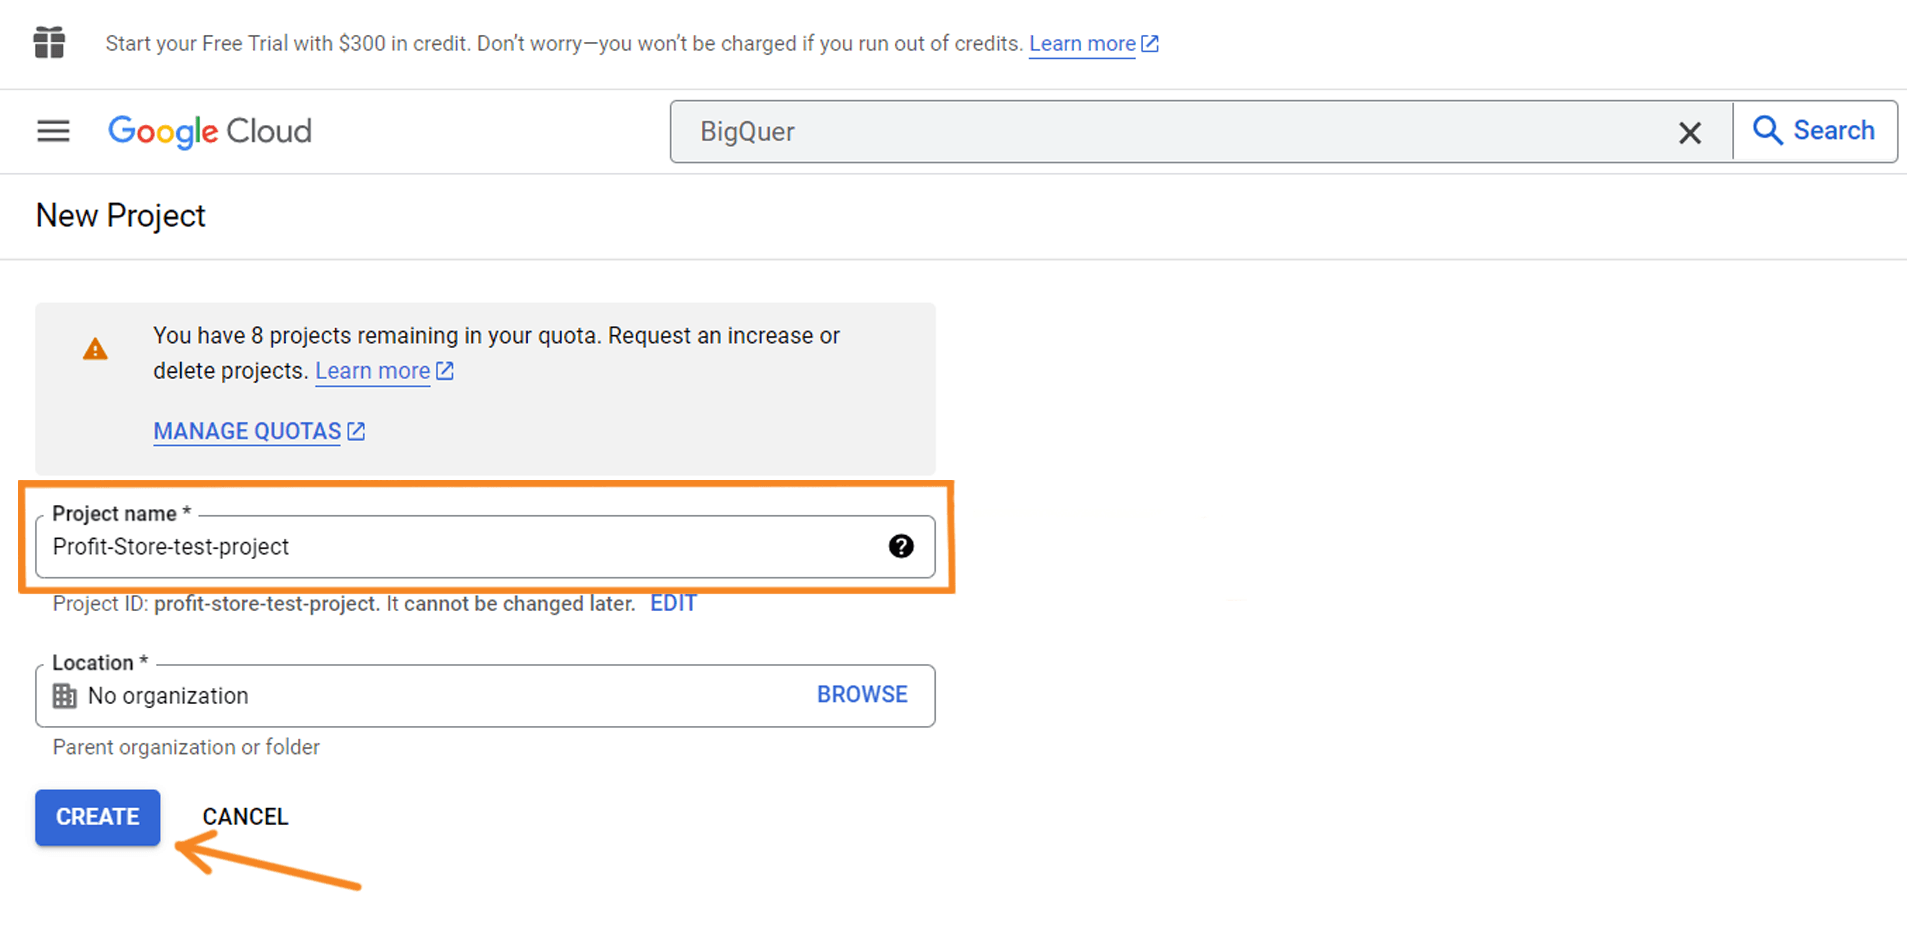
Click the CREATE PROJECT button to create a project. Name your project, select an organisation if necessary, and click CREATE.
You are now officially welcome to BigQuery.
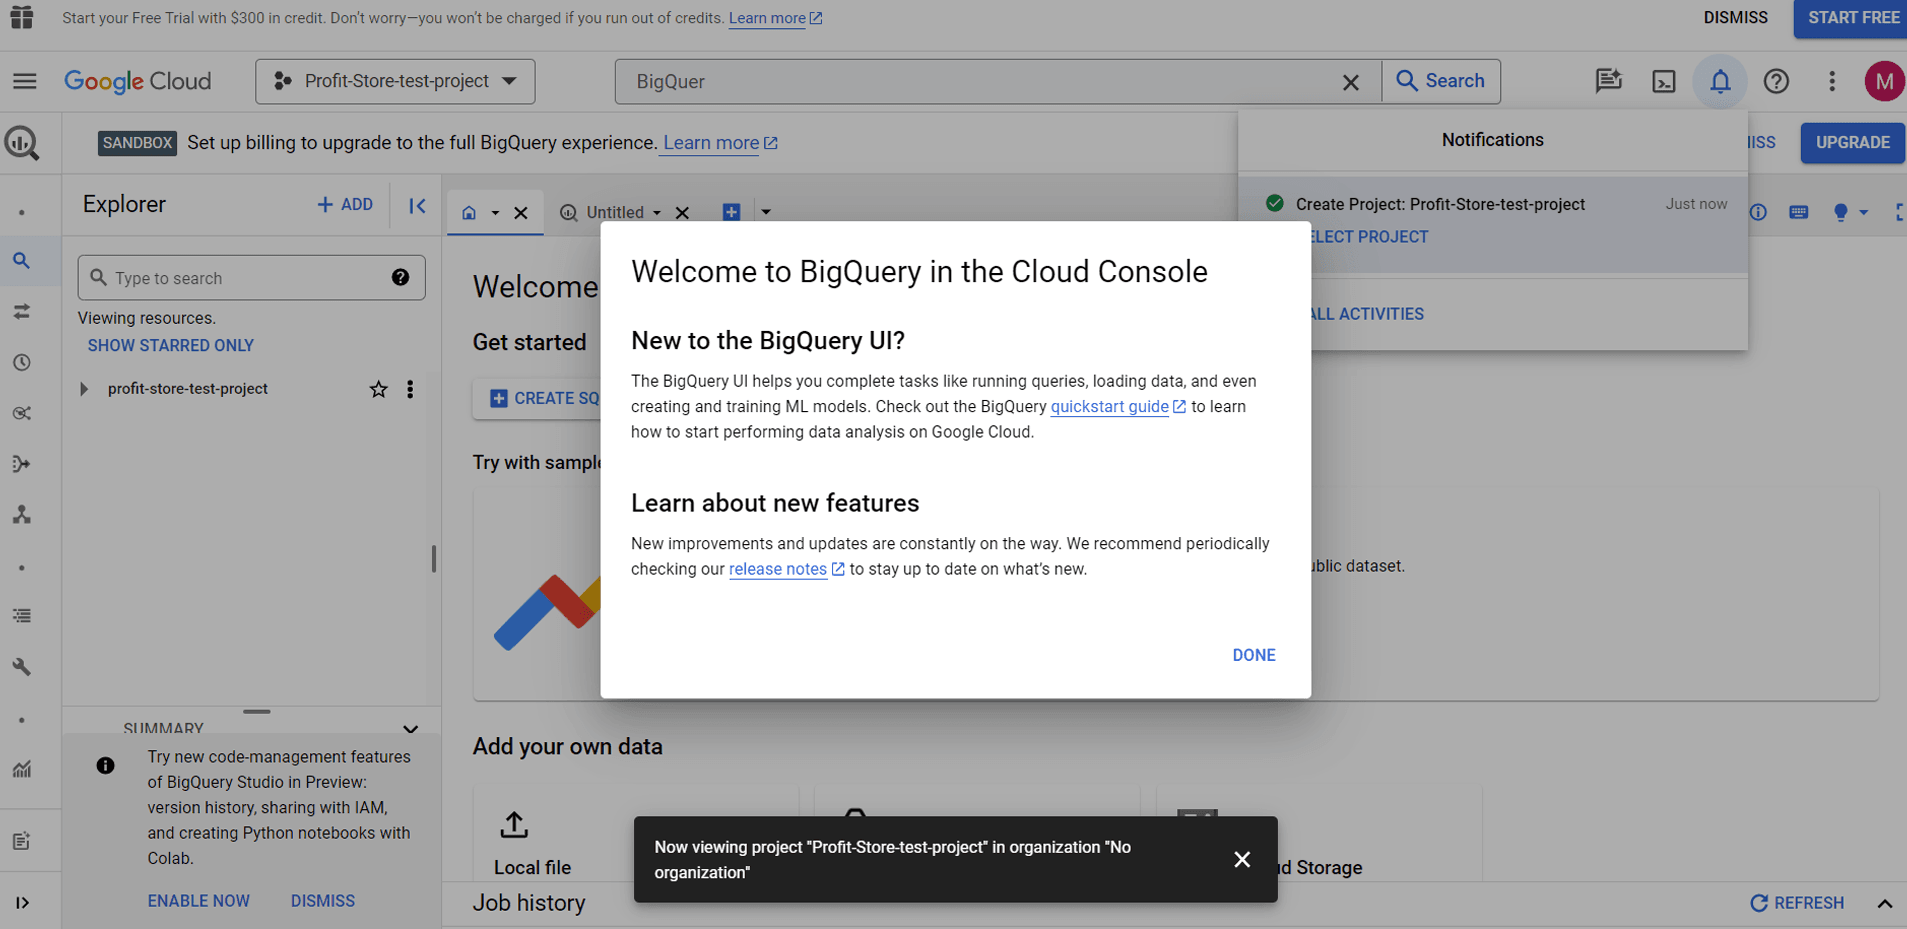
SANDBOX BigQuery
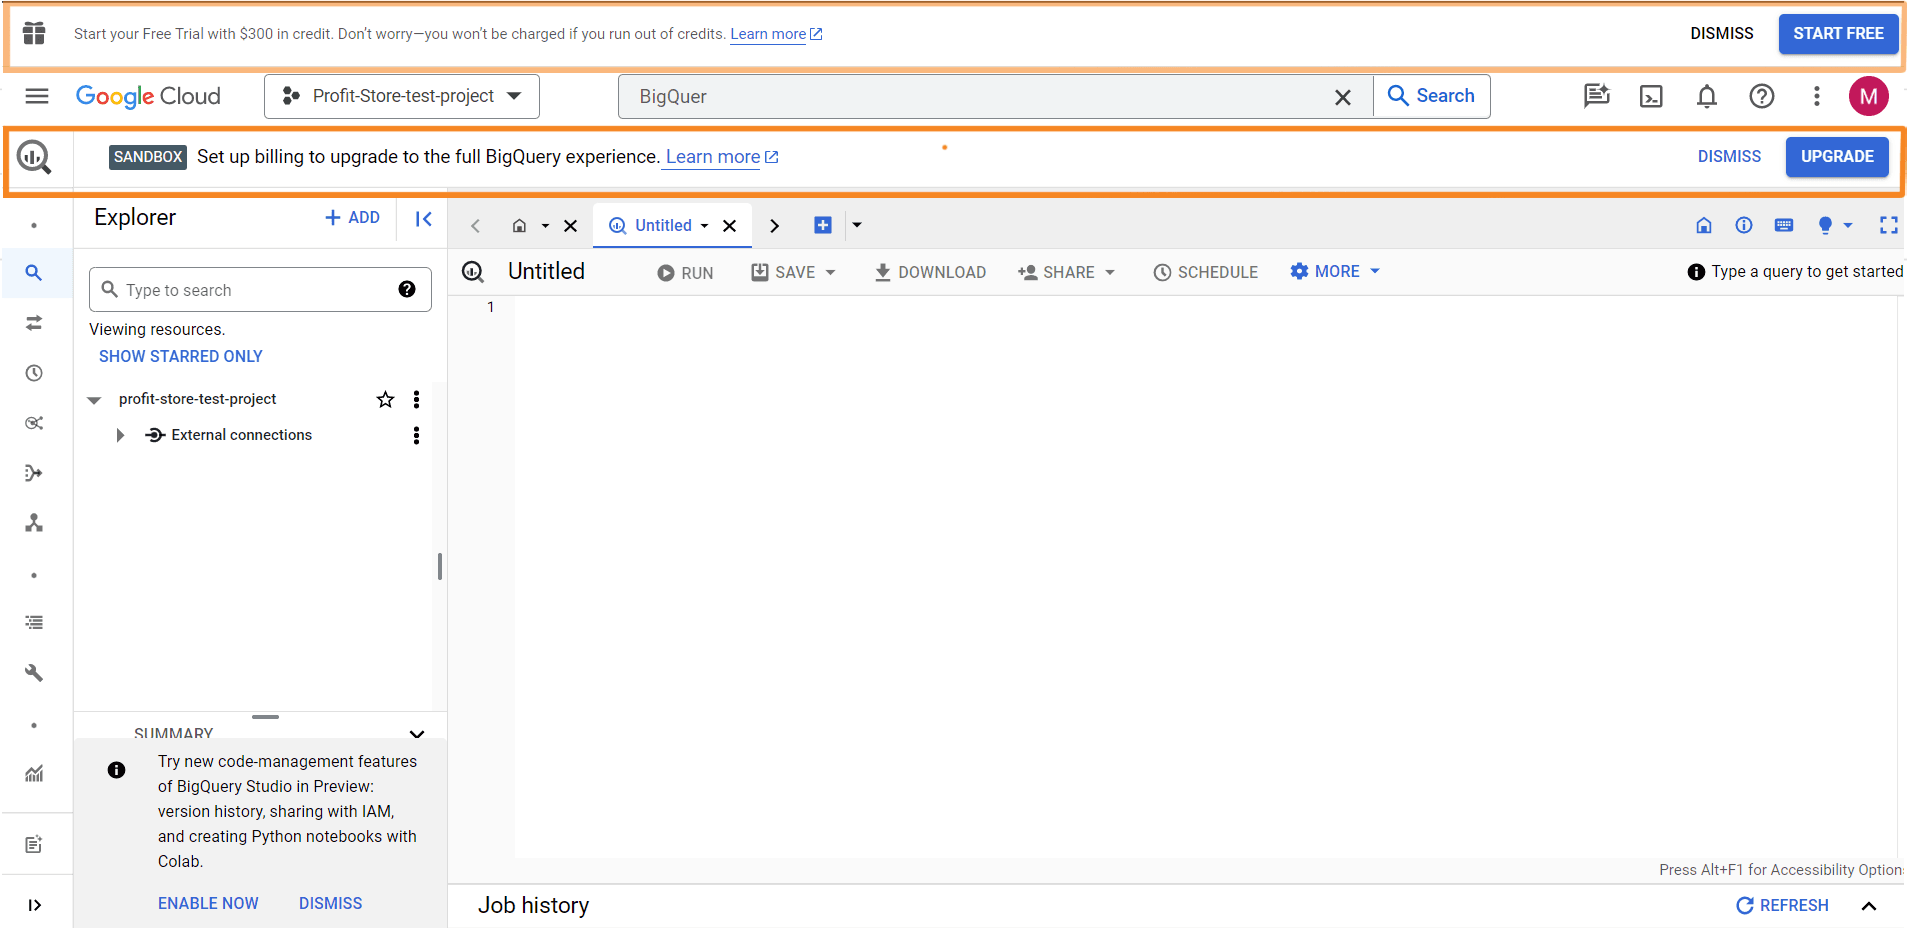
Using SANDBOX or "Sandbox" in the context of BigQuery means using an account in a test environment where you do not have to enter any payment information. This mode allows you to use BigQuery for free with certain restrictions: you get 10 GB of active storage and 1 TB of data processed by queries per month. It should be noted, however, that when using the SANDBOX mode, the tables created in the account will have an expiration date, which will expire 60 days after they are created.
The second option is to activate the free trial version of BigQuery, which is different from the sandbox mode. The main difference is that in order to activate the trial, you must enter your payment details. After fulfilling this requirement, users will receive $300 in cloud credits that can be used to access a wider range of Google Cloud services, including BigQuery.
In Google BigQuery, we will be using the Sandbox option.
Creating a dataset in BigQuery
Let's add data to BigQuery to see how it works. Click on the project you want to use and then click on 'Create dataset'.
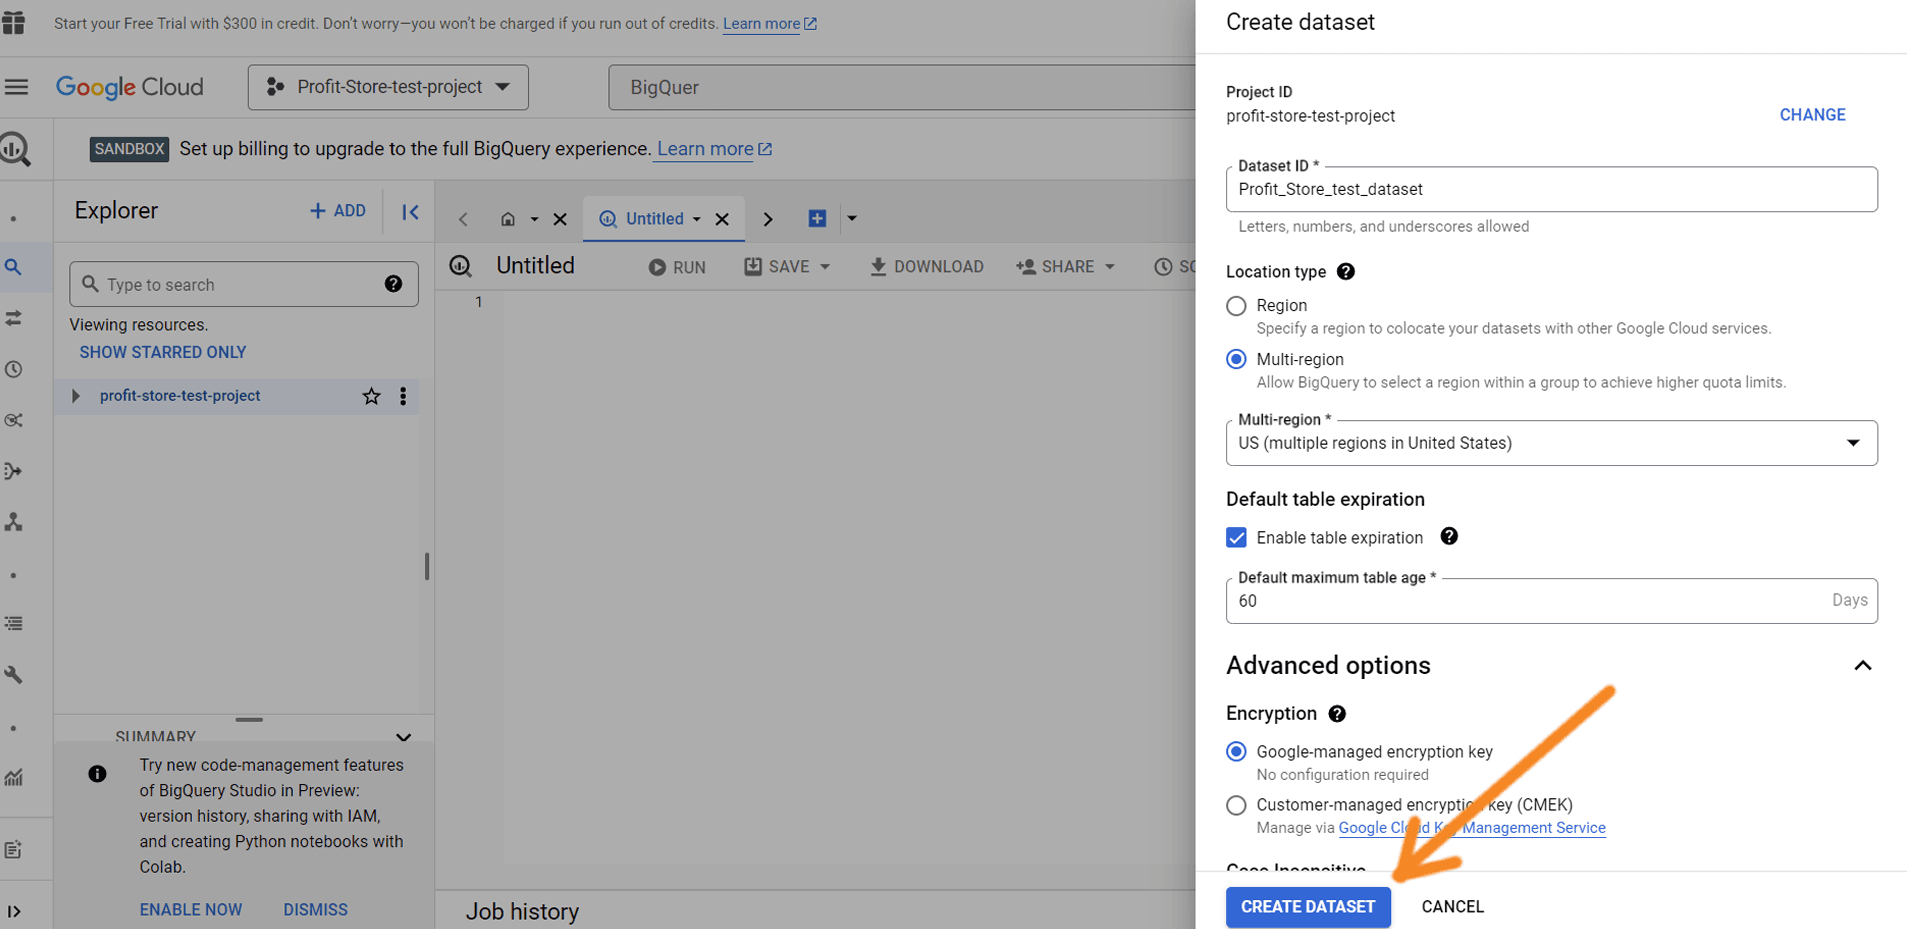
Assign a record identifier - you can enter letters and numbers. If required, you can select the location of the data, the table validity period (up to 60 days) and encryption. Then click Create Record.
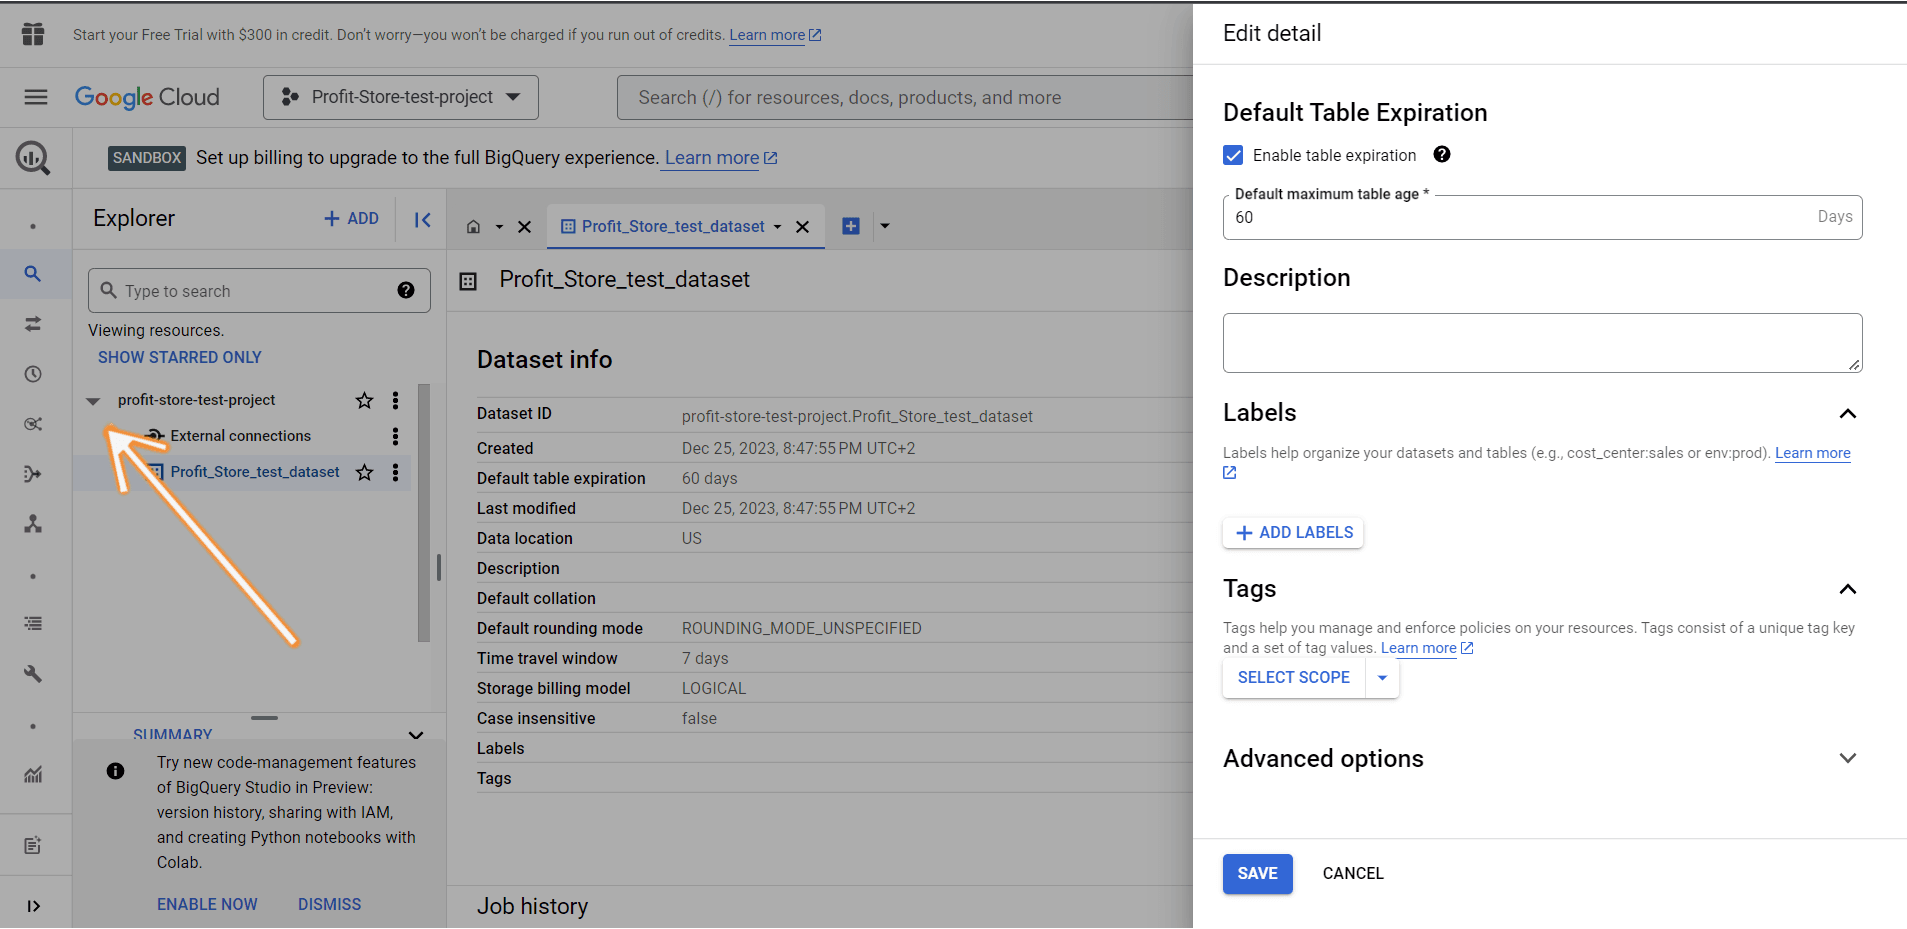
A new record has been created. You can find it by clicking the Expand Nodes button next to the project name:
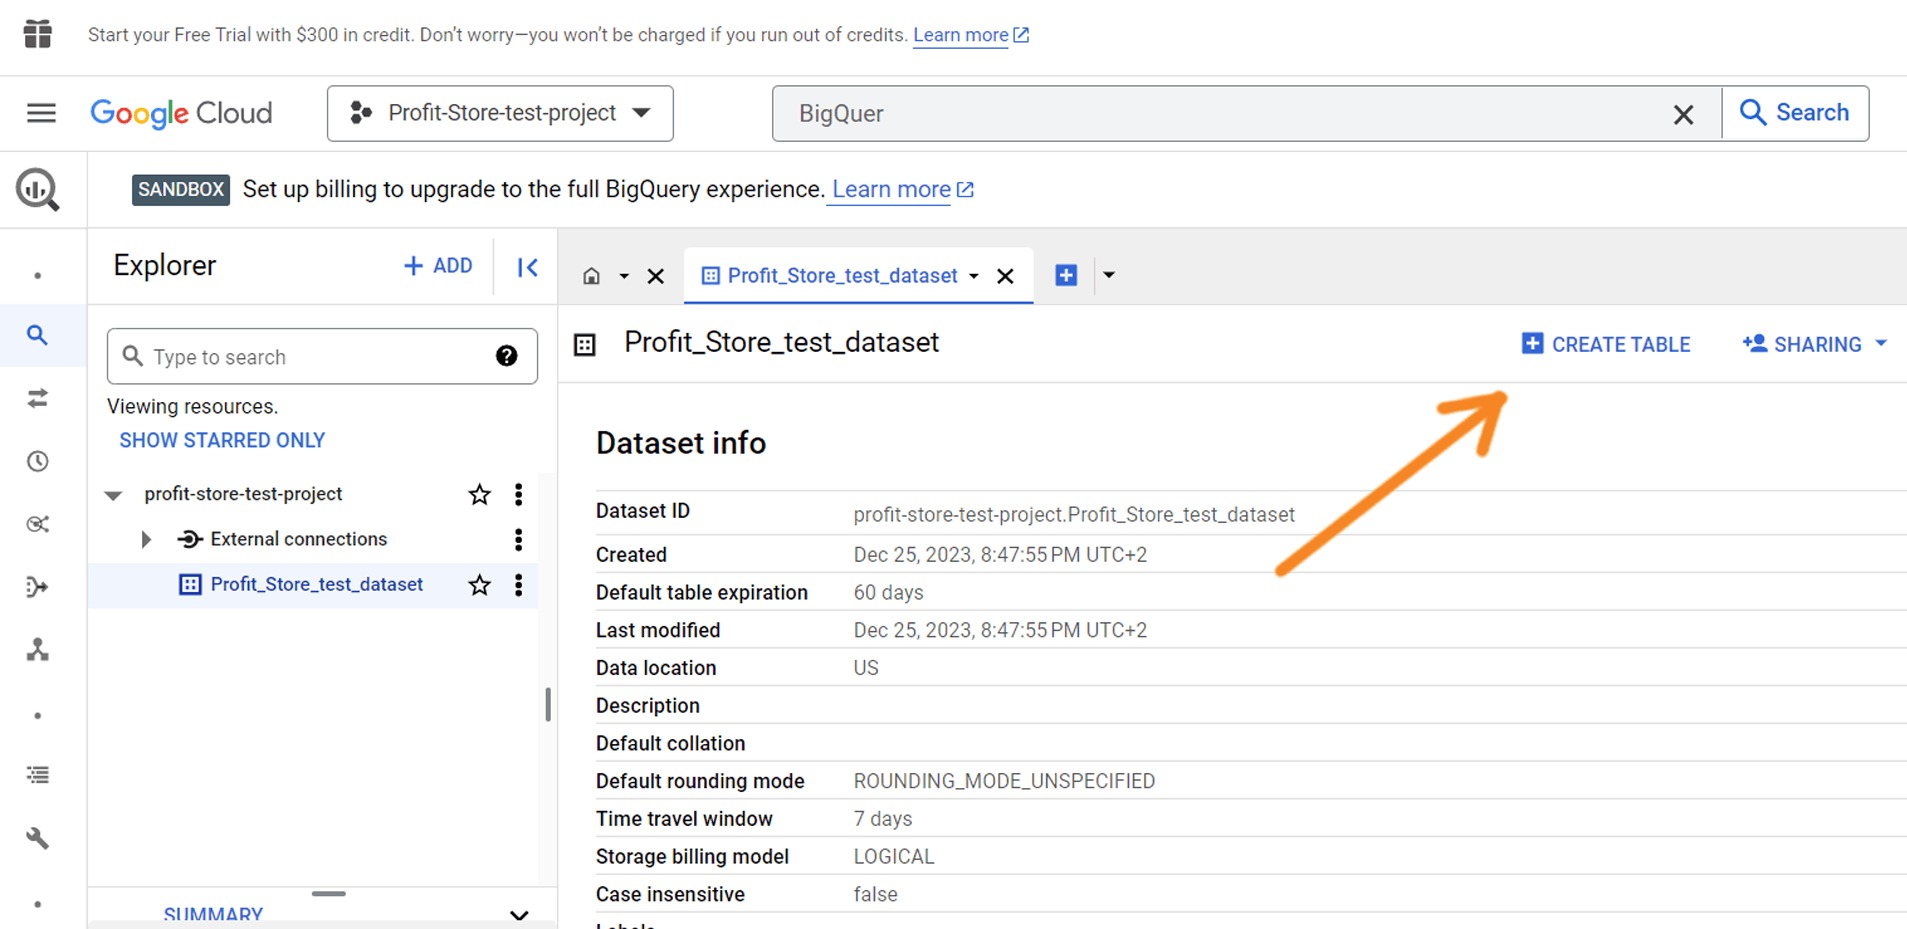
The next step is to create a table in the dataset. Click the Create Table button:
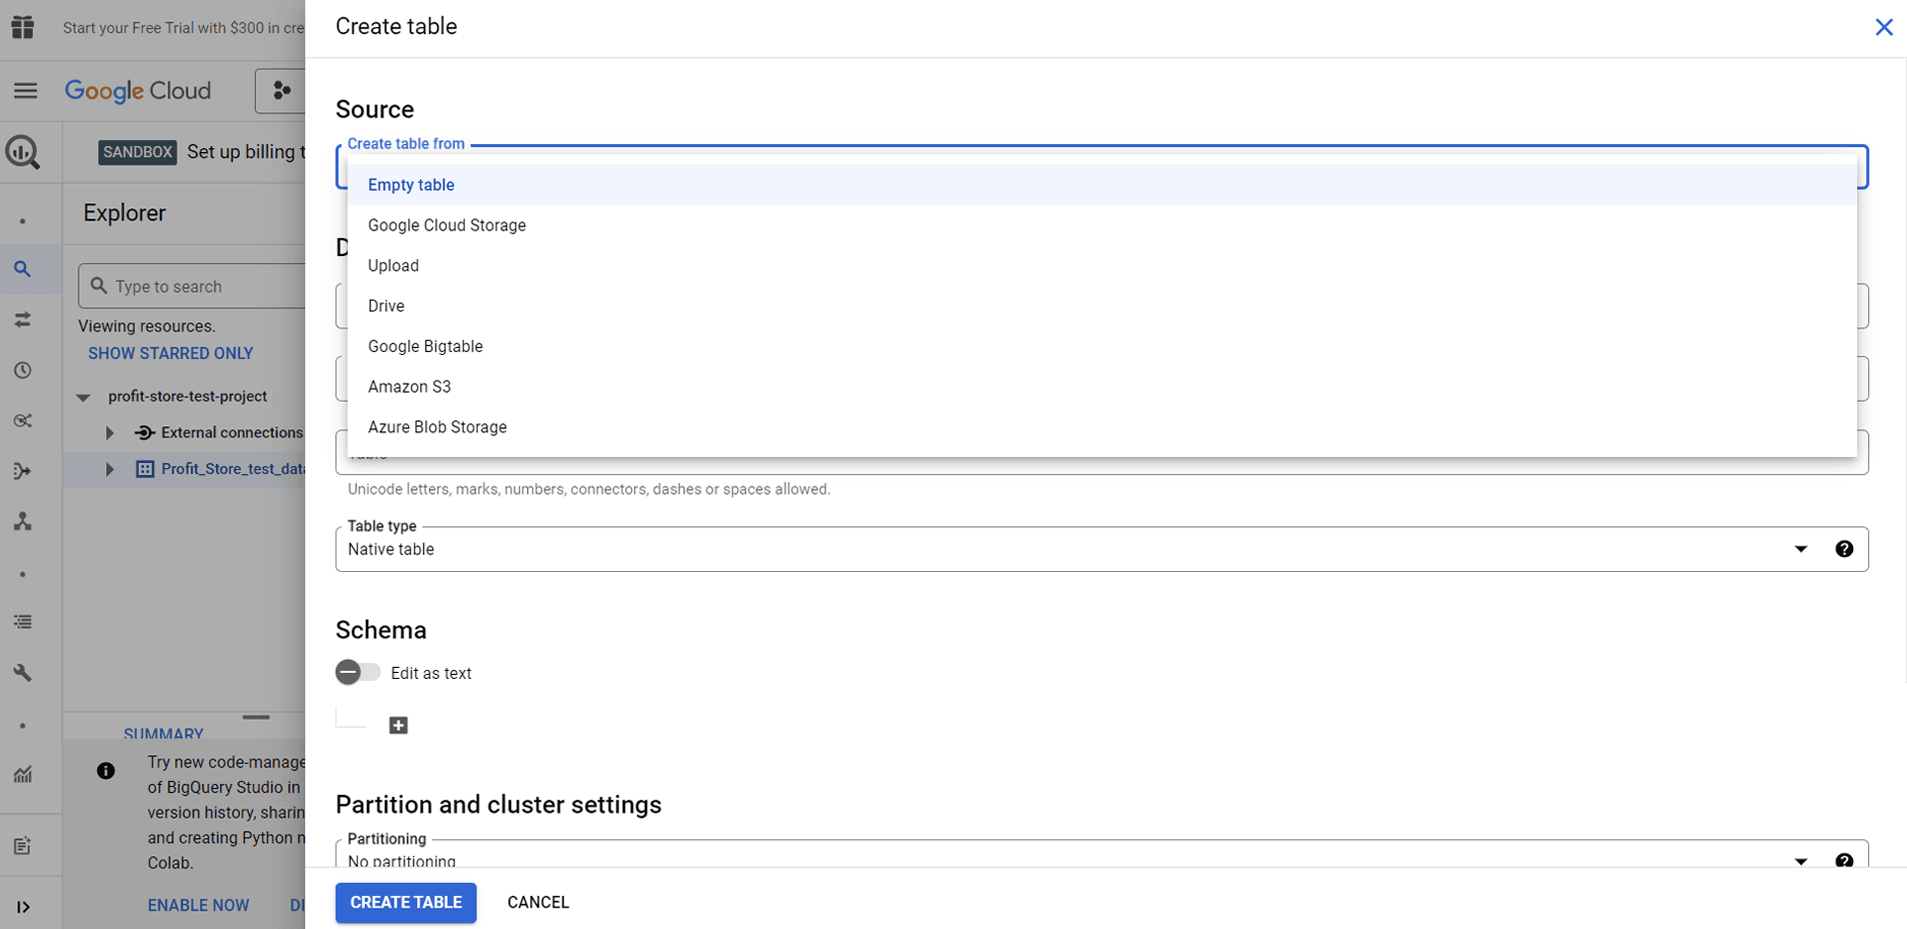
There are several options here:
- Create an empty table and fill it in manually.
- Upload a spreadsheet from a device in one of the supported formats.
- Import a spreadsheet from Google Cloud Storage or Google Drive.
- Import a table from Google Cloud Bigtable using the command line interface.
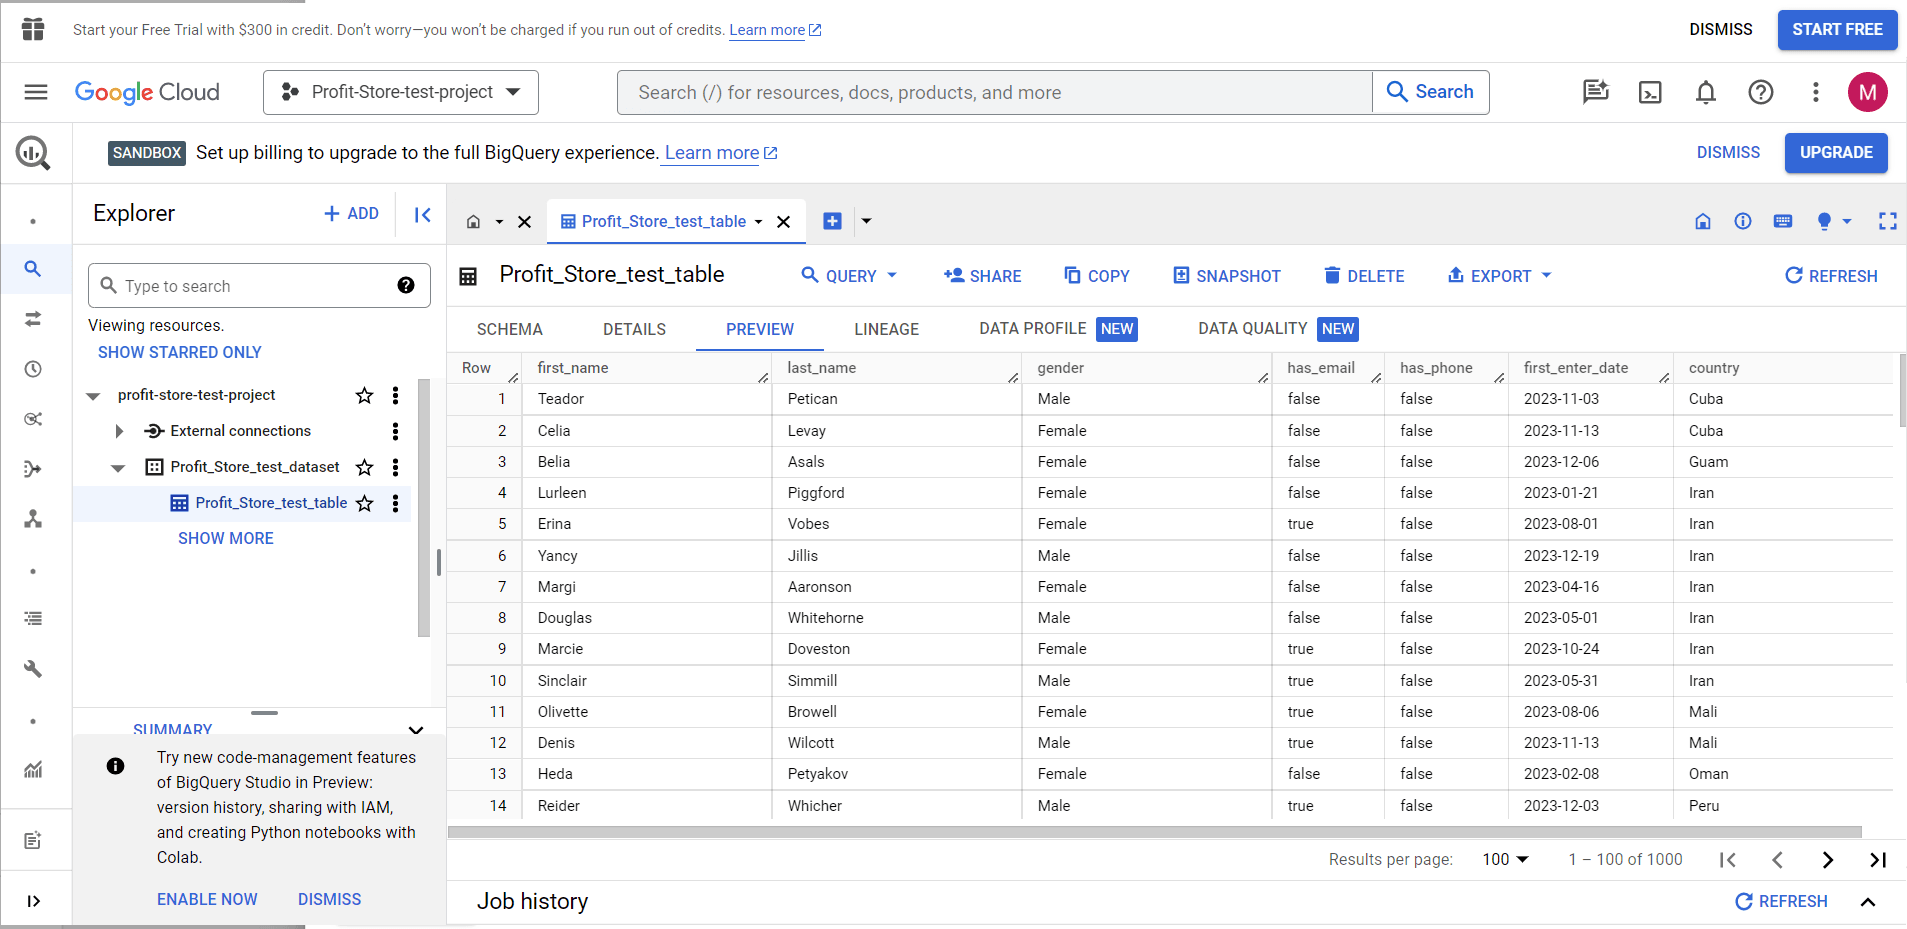
File formats that can be imported into BigQuery
Tabular data can be easily imported into BigQuery in the following formats:
- CSV
- JSONL (лінії JSON)
- Avro
- Parquet
- ORC
- Google Sheets (only for Google Drive)
- Cloud storage backup (for Google Cloud Storage only)
Note: You cannot import Excel files directly into BigQuery. You must either convert the Excel file to CSV or convert Excel to Google Sheets and then upload it to BigQuery.
Loading CSV data into BigQuery
After clicking the "Create table" button, you need to follow these steps:
- Select the source - "Upload"
- Select a file - click Browse and select the CSV file on your device.
- File format - select "CSV", but usually the system detects the file format automatically.
- Enter the name of the table.
- Select the "Auto detect" check box.
- Click "Create table".
This is the main flow. You can also define partition parameters (to divide the table into smaller segments), cluster parameters (to organise data based on the contents of specified columns), and configure additional advanced options.

Note. The table preview feature allows you to preview tables stored in BigQuery. For example, if you upload a CSV stored in BigQuery, you will see a preview sheet.
Importing data from Google Sheets into BigQuery
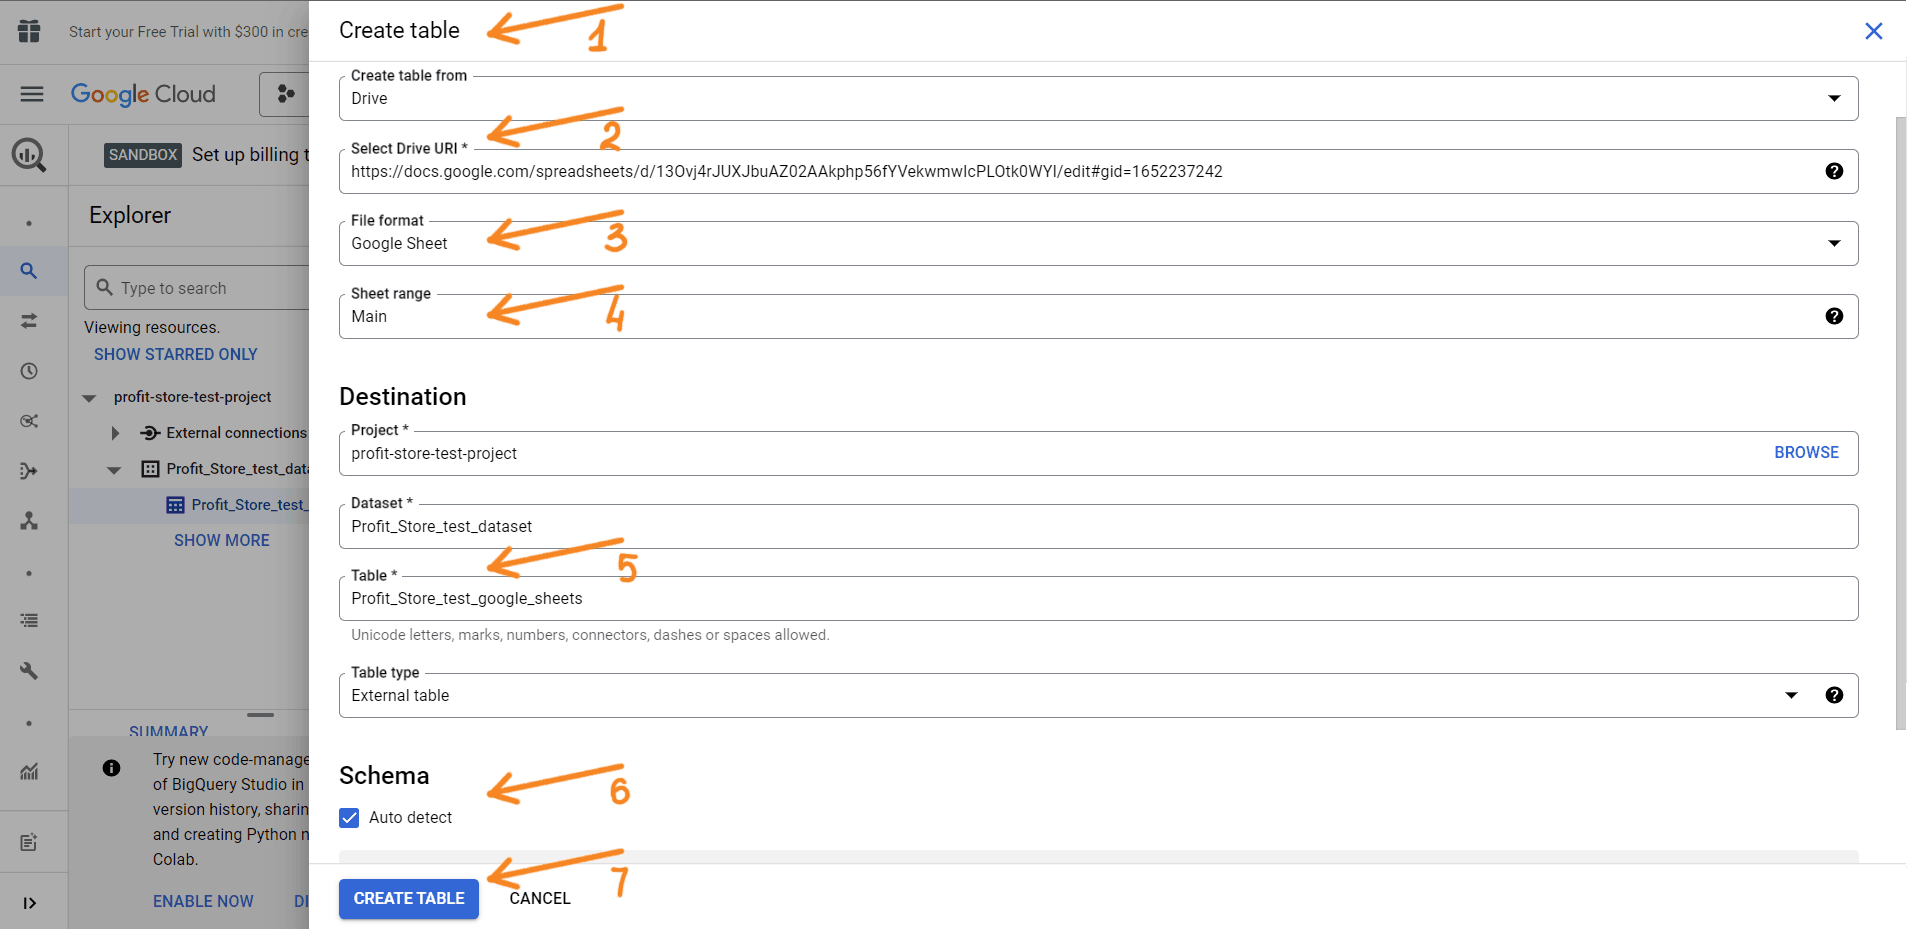
Many of you are wondering how to import spreadsheets from Google Sheets into BigQuery. The process is quite simple, although it does involve some specific steps. Here are the main steps you need to follow:
- Click the "Create table" button:
- Select the source - "Drive"
- Select Drive URI - paste the URL of a Google Sheets spreadsheet.
- File format - select "Google Sheets".
- Worksheet range - specify the worksheet and range of data to import. If you leave this field blank, BigQuery will pull data from the first sheet of the spreadsheet.
- Enter the name of the table.
- Select the "Auto detect" check box.
- Click "Create table".
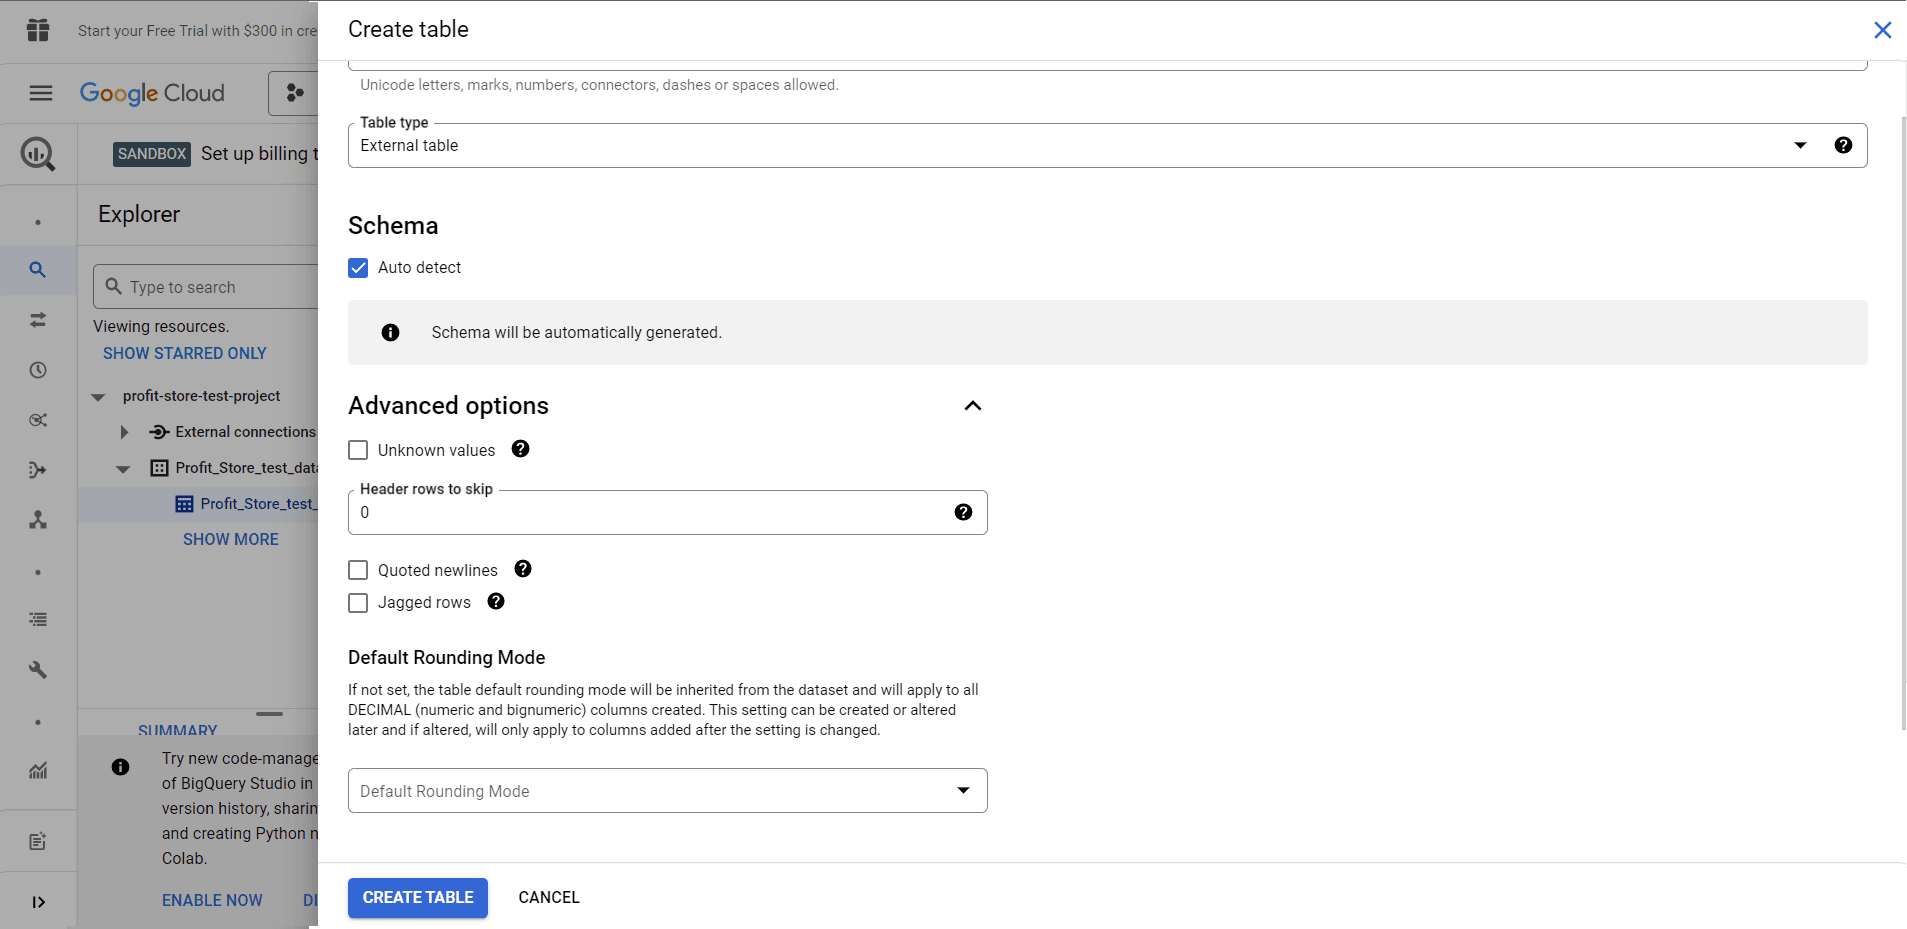
You may be interested to know how to configure the advanced options, as they allow you to do this:
- Skip rows with column values that do not match the pattern.
- Skip a number of lines from the top.
- Allow the inclusion of new rows contained in quoted data sections.
- Allow acceptance of rows that do not have a final optional column.
- Choose an encryption key management solution.
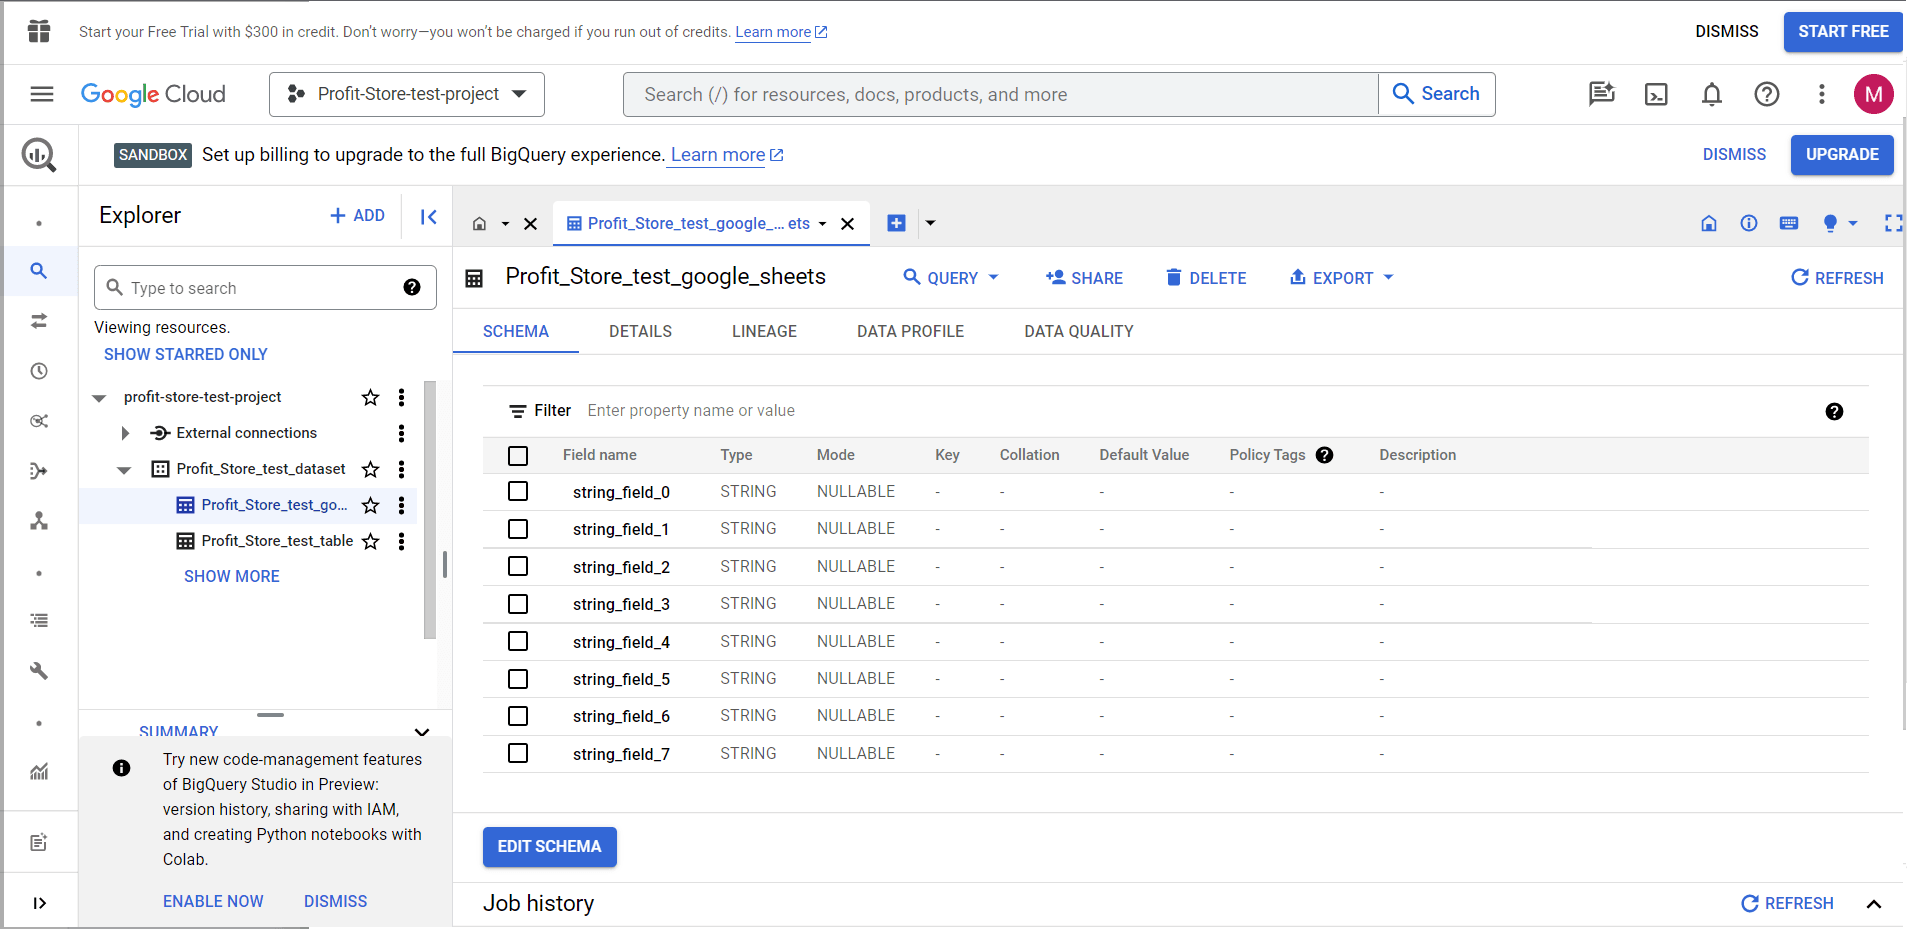
After clicking "Create table" in BigQuery, the selected worksheet from Google Sheets is imported into BigQuery.
Importing data from a source into BigQuery
If you have a dataset in Airtable, QuickBooks or another source that you want to import into BigQuery, there are two main ways to do this: manual import via CSV or automated import using ETL tools.
Query tables in BigQuery
The power of BigQuery is manifested primarily in query processing. This tool allows you to query database tables using a universal SQL dialect. Although BigQuery is also compatible with non-standard or outdated versions of SQL, it is recommended to use the standard SQL dialect.
If you know what the QUERY function looks like in Google Sheets, you should understand how queries work. For example, here's an example of a QUERY formula:
=query(Deals!A:EU, "select E, N, T order by T Desc")
"select E, N, T order by T Desc" - is a query to retrieve three columns of the entire data set and sort the results.
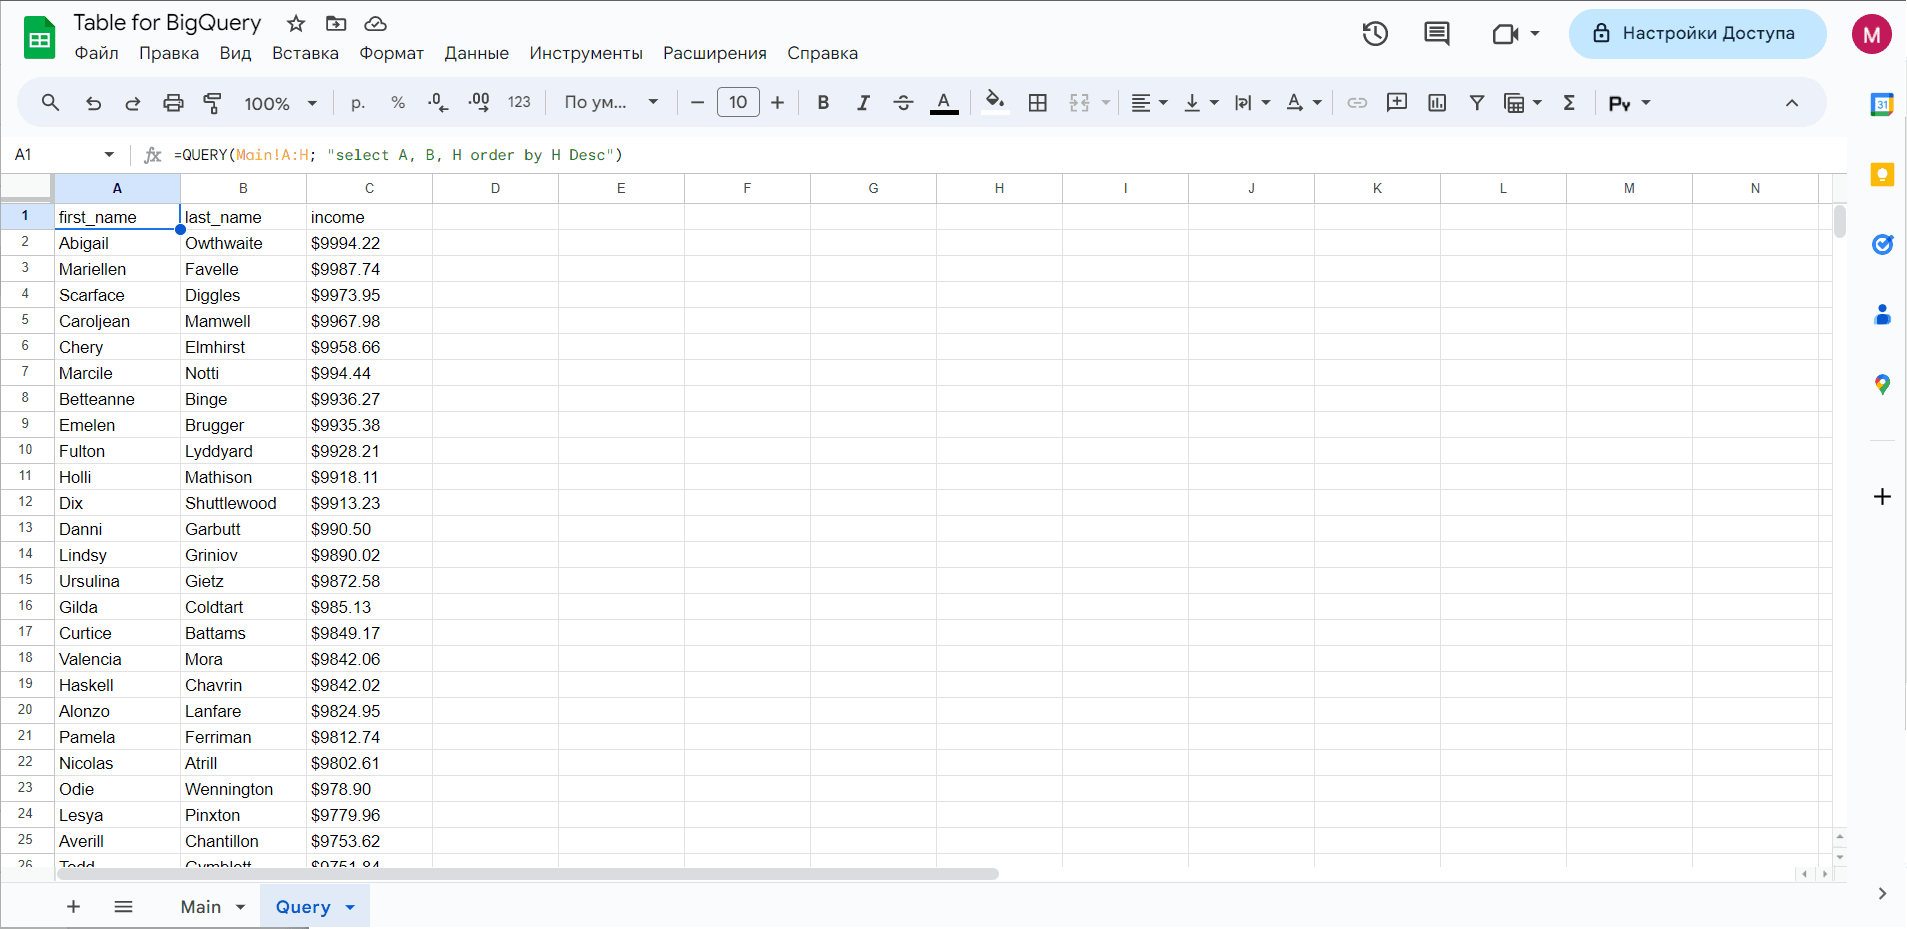
In BigQuery, the same query against a dataset will look like this
SELECT
string_field_4,
string_field_13,
string_field_19
FROM `test-project-310714.test.pipedrive-deals`
ORDER BY string_field_19 DESC
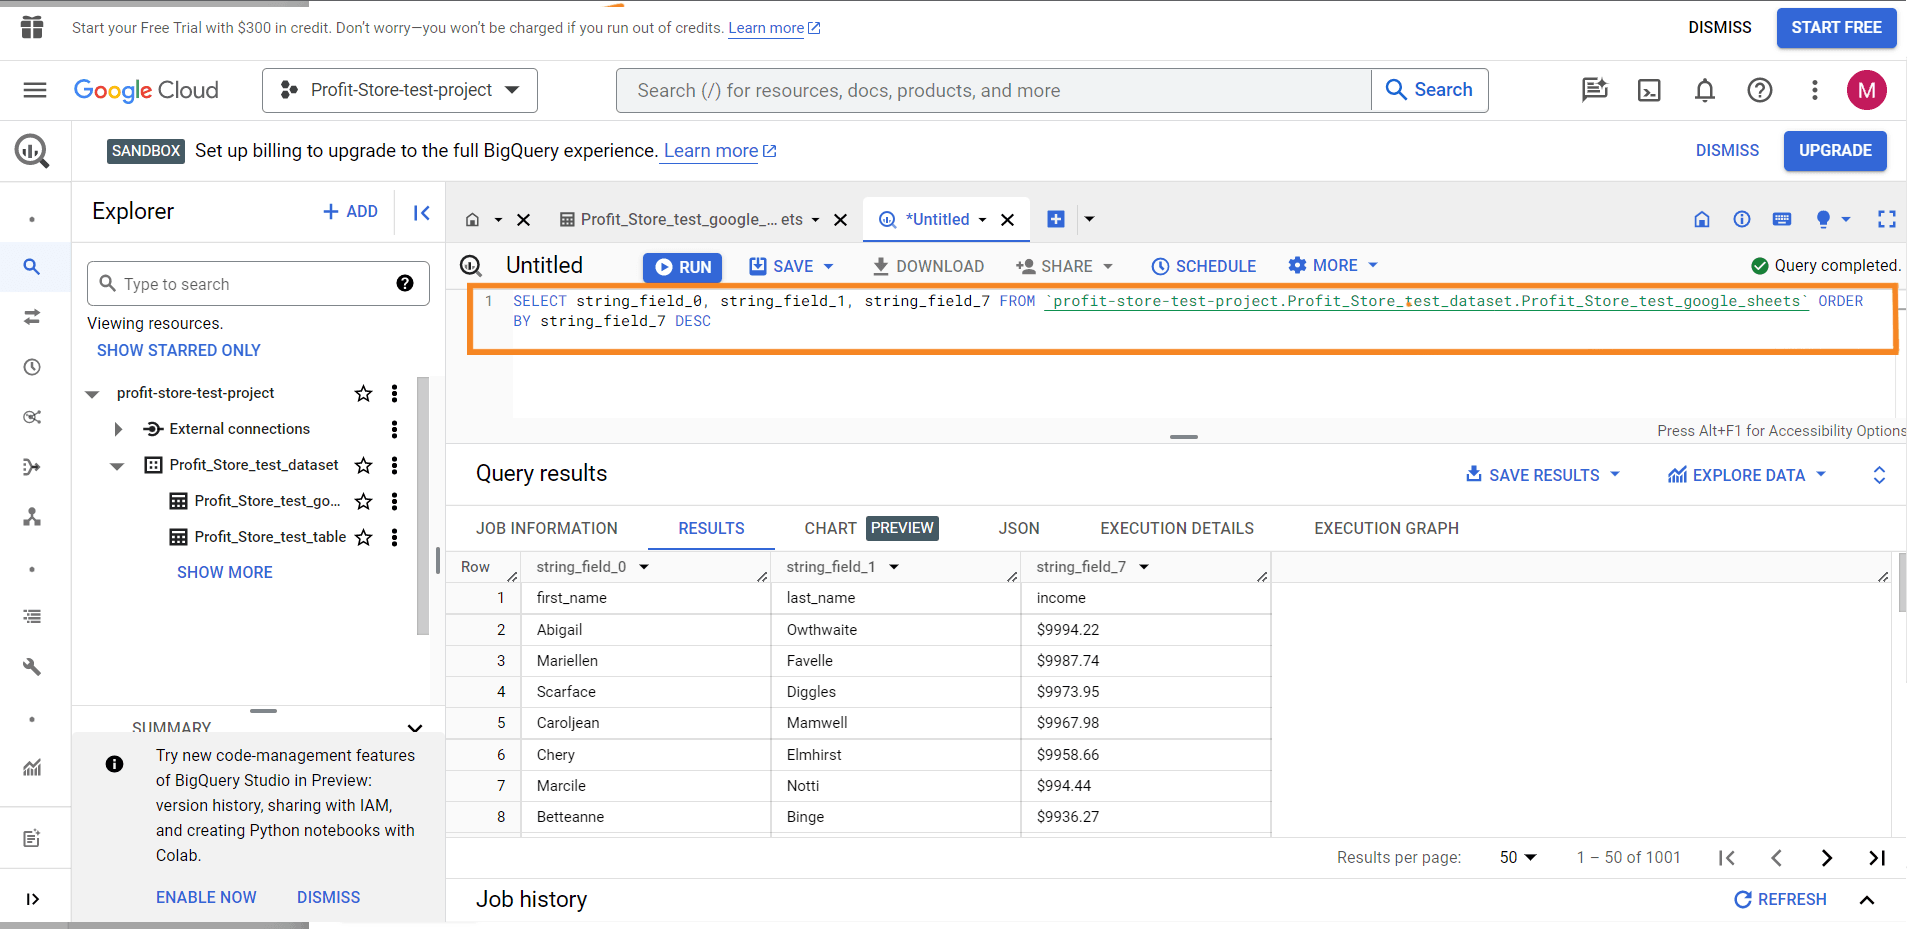
Now let's explain how it works. How to query data in an example of BigQuery+ syntax.
Click on the Query Table button to start a query.
You will see, for example, a query template:
SELECT FROM test-project-310714.test.pipedrive-deals LIMIT 1000
This is a basic example to get you started with queries. Add a * after the SELECT method to make the query look like this:
SELECT * FROM test-project-310714.test.pipedrive-deals LIMIT 1000
This query will return all available columns from the specified table, but no more than 1000 rows. Click RUN and you're done.
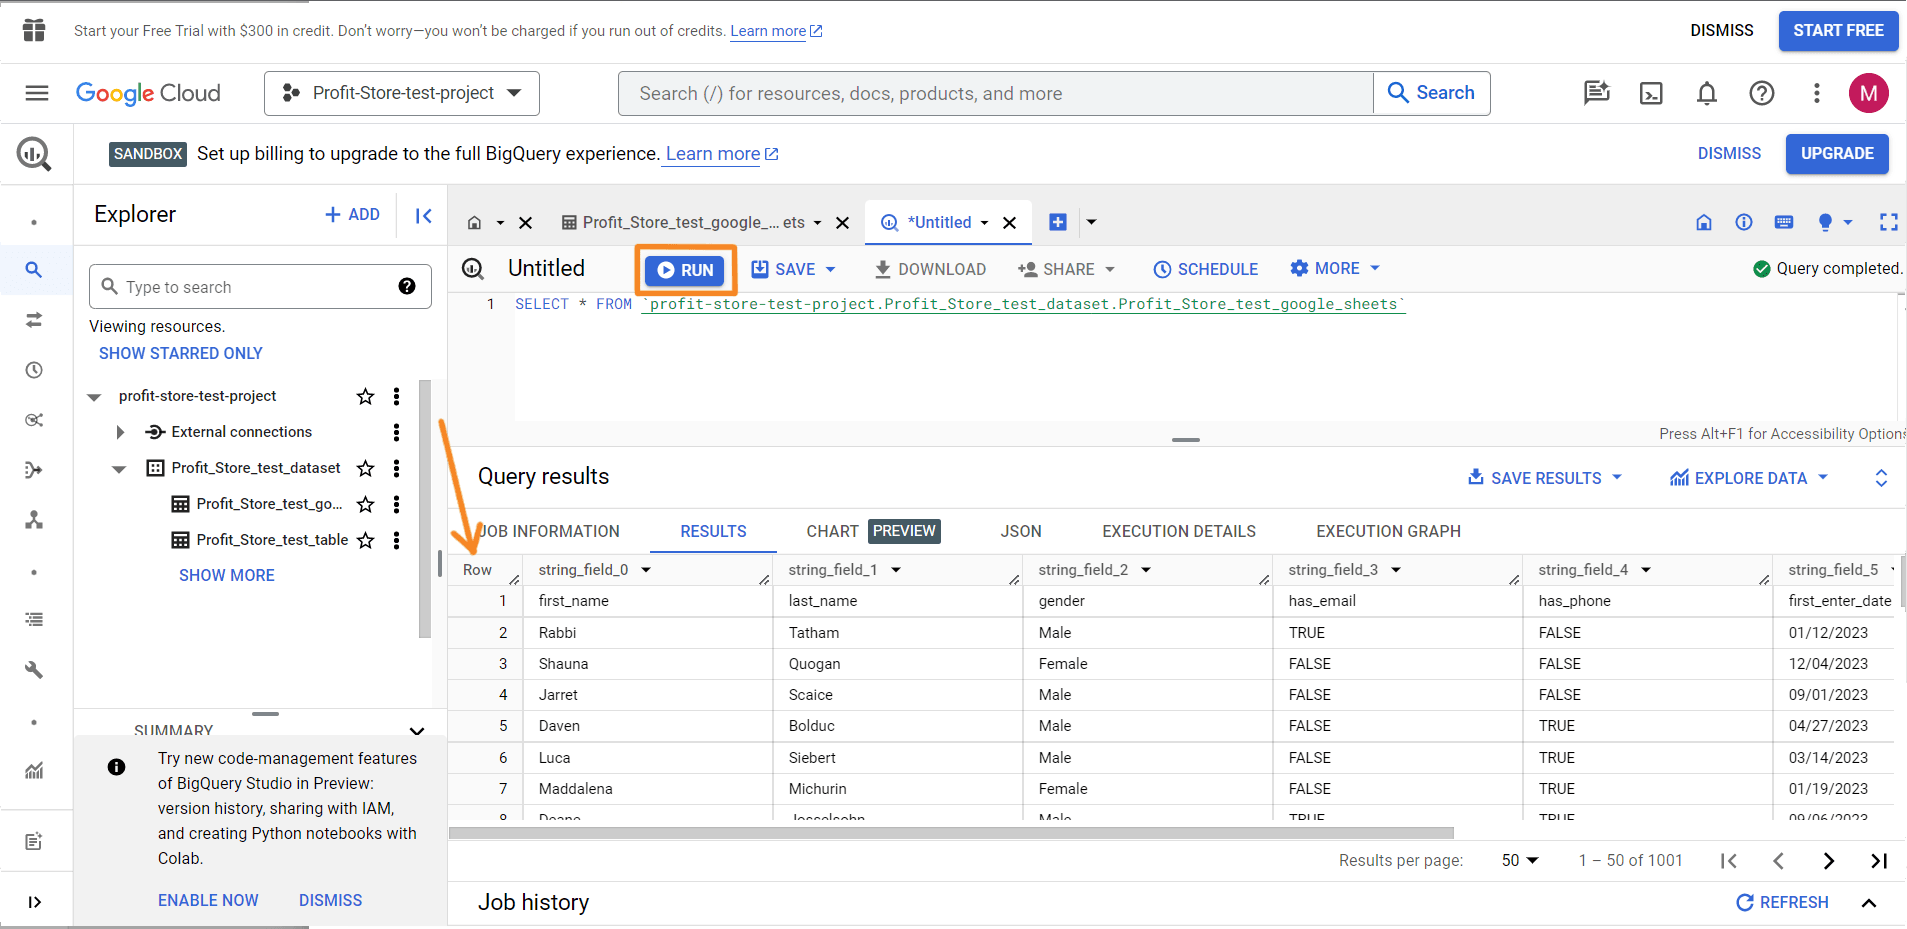
Now let's look at some fields (columns) and sort them. So instead of using *, you need to specify the field names you want. You can find the field names in the Results tab or in your last query.
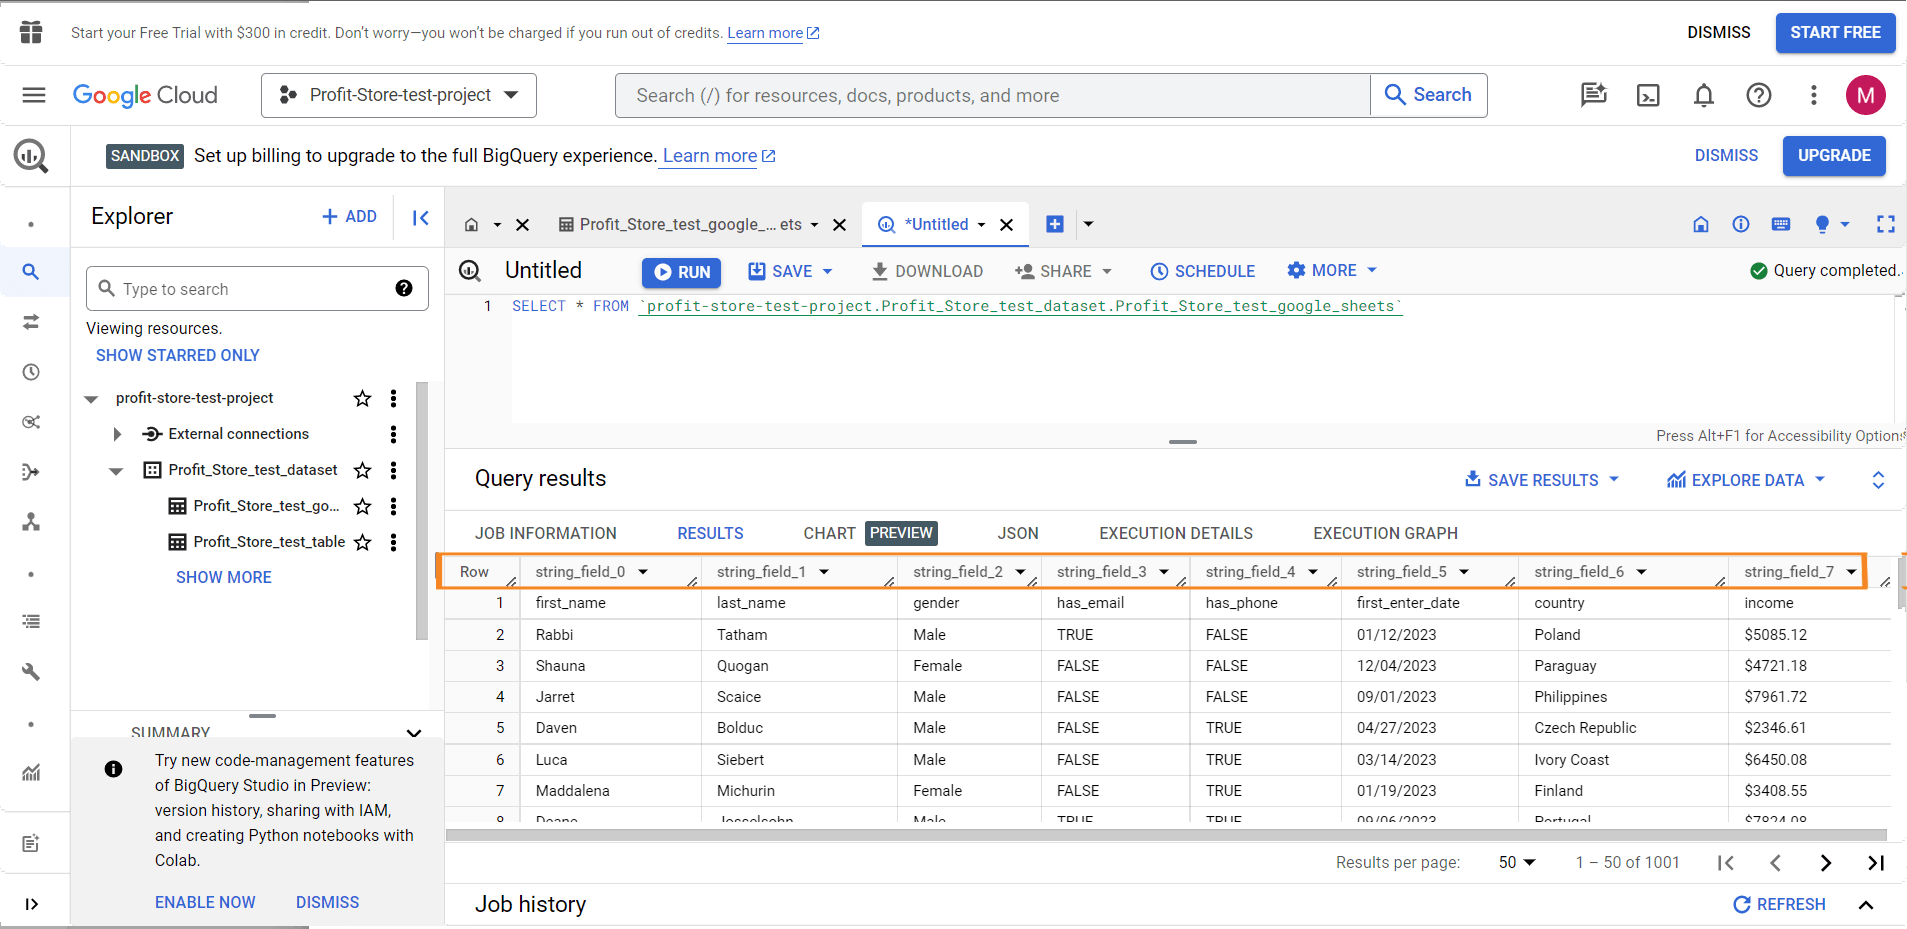
Replace the LIMIT method from the default query with ORDER BY - this allows you to sort the data by the specified column. To sort the data in descending order, add DESC to the end of the query. This is what it looks like:
SELECT
string_field_4,
string_field_13,
string_field_19
FROM `test-project-310714.test.pipedrive-deals`
ORDER BY string_field_19 DESC
Query settings
If you click the MORE button and select Query Settings, you can configure the destination for the query results and other settings.
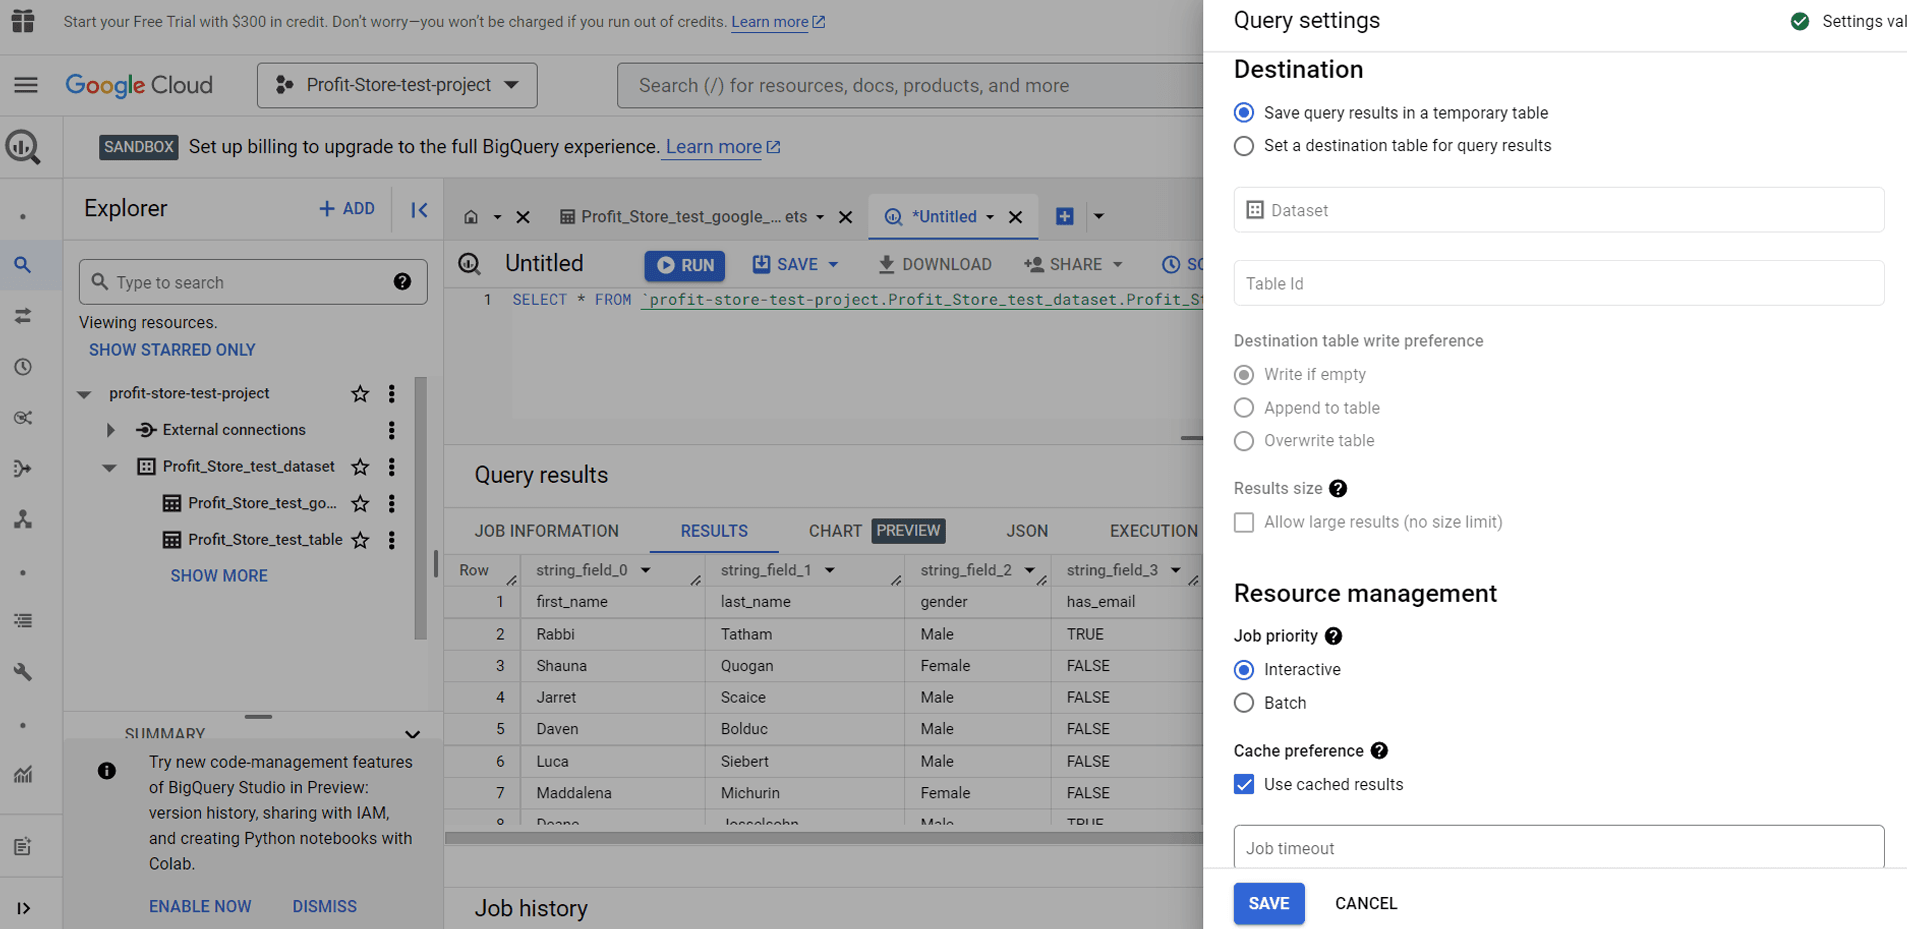
You can also configure queries to run in batch mode. Batch queries are queued and run as soon as free resources become available in the BigQuery resource pool.
How to save queries in BigQuery
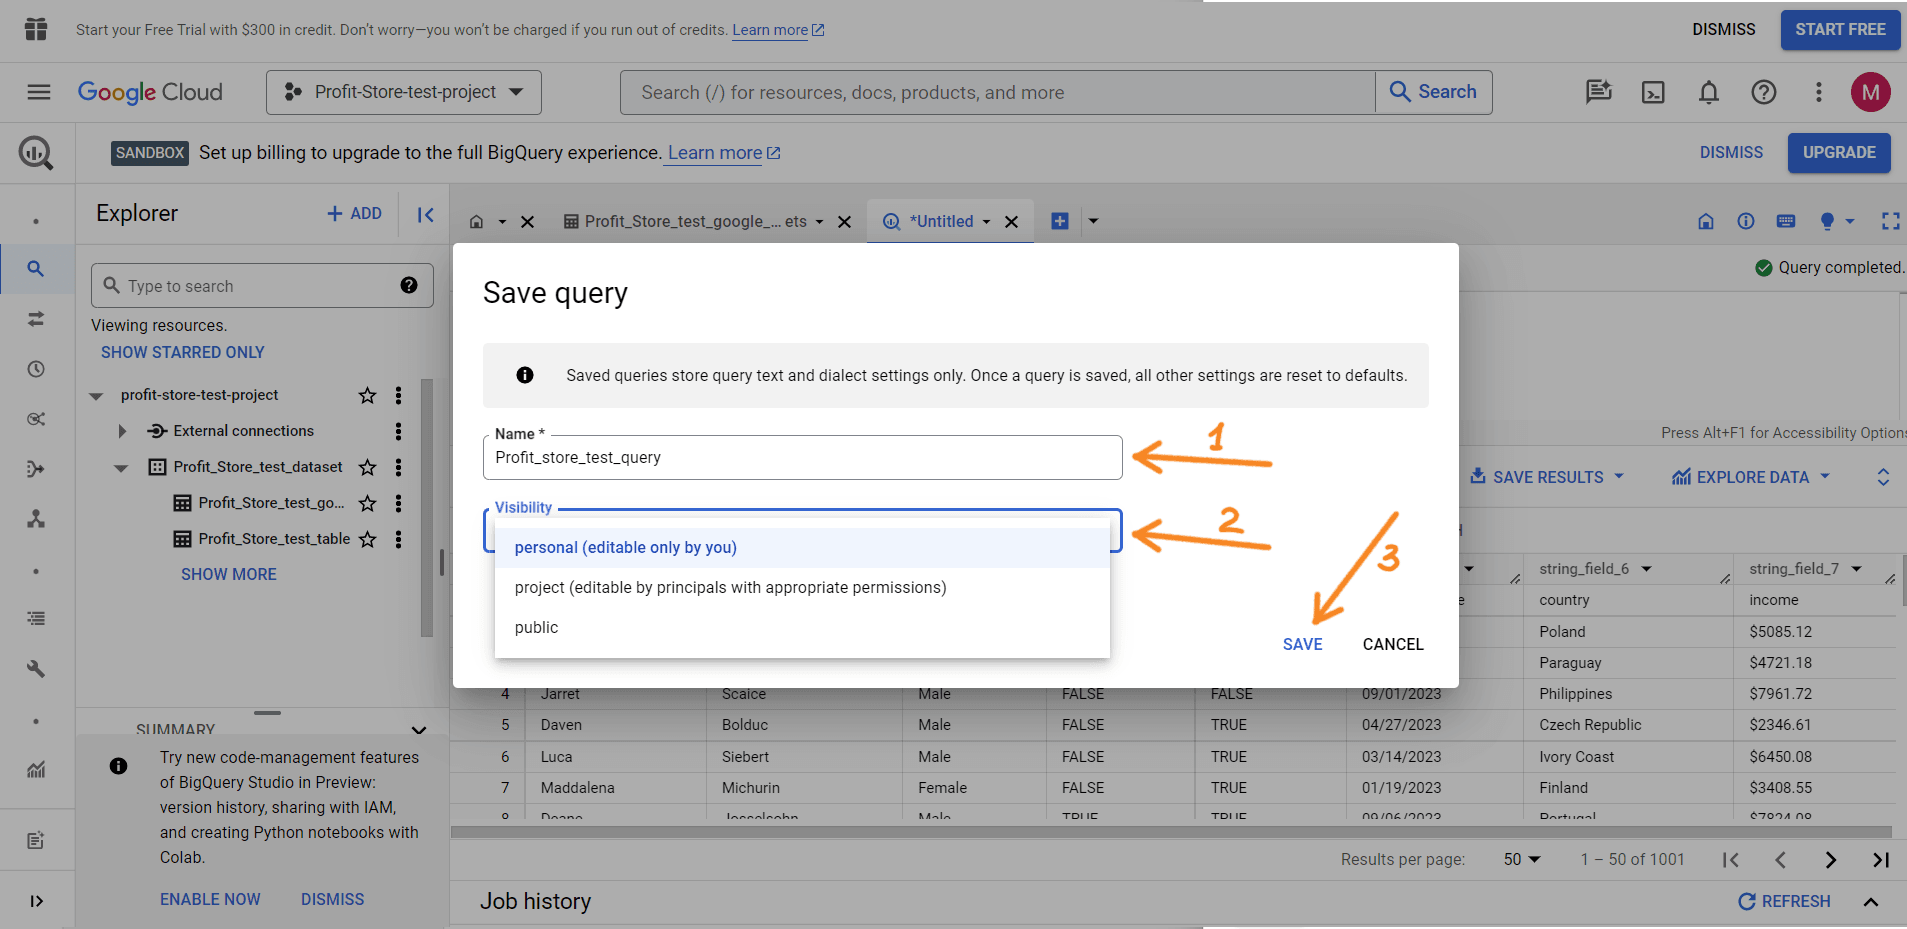
You can save your queries for future use. To do this, click on "Save" => "Save query".
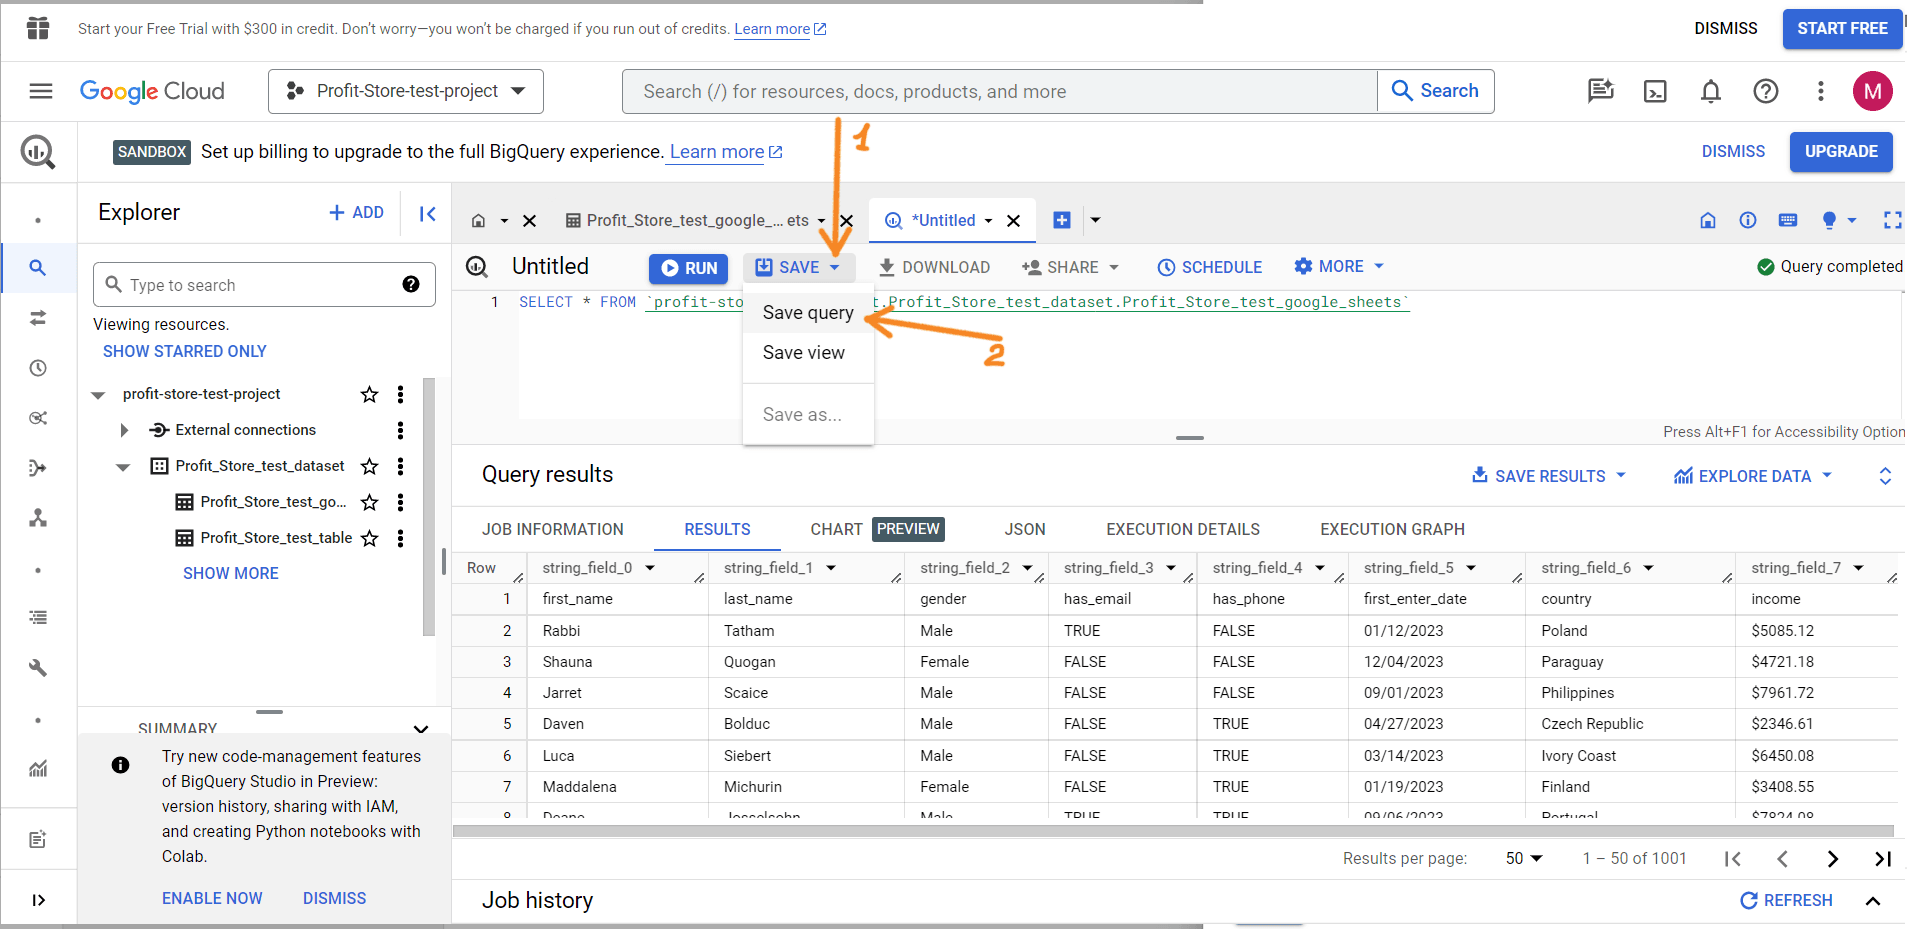
In the next window, name your query and specify its visibility:
- personal - only you can edit the request;
- project - only project members can edit the request;
- public - the request will be publicly available for editing.
- SAVE.
How to schedule queries in BigQuery
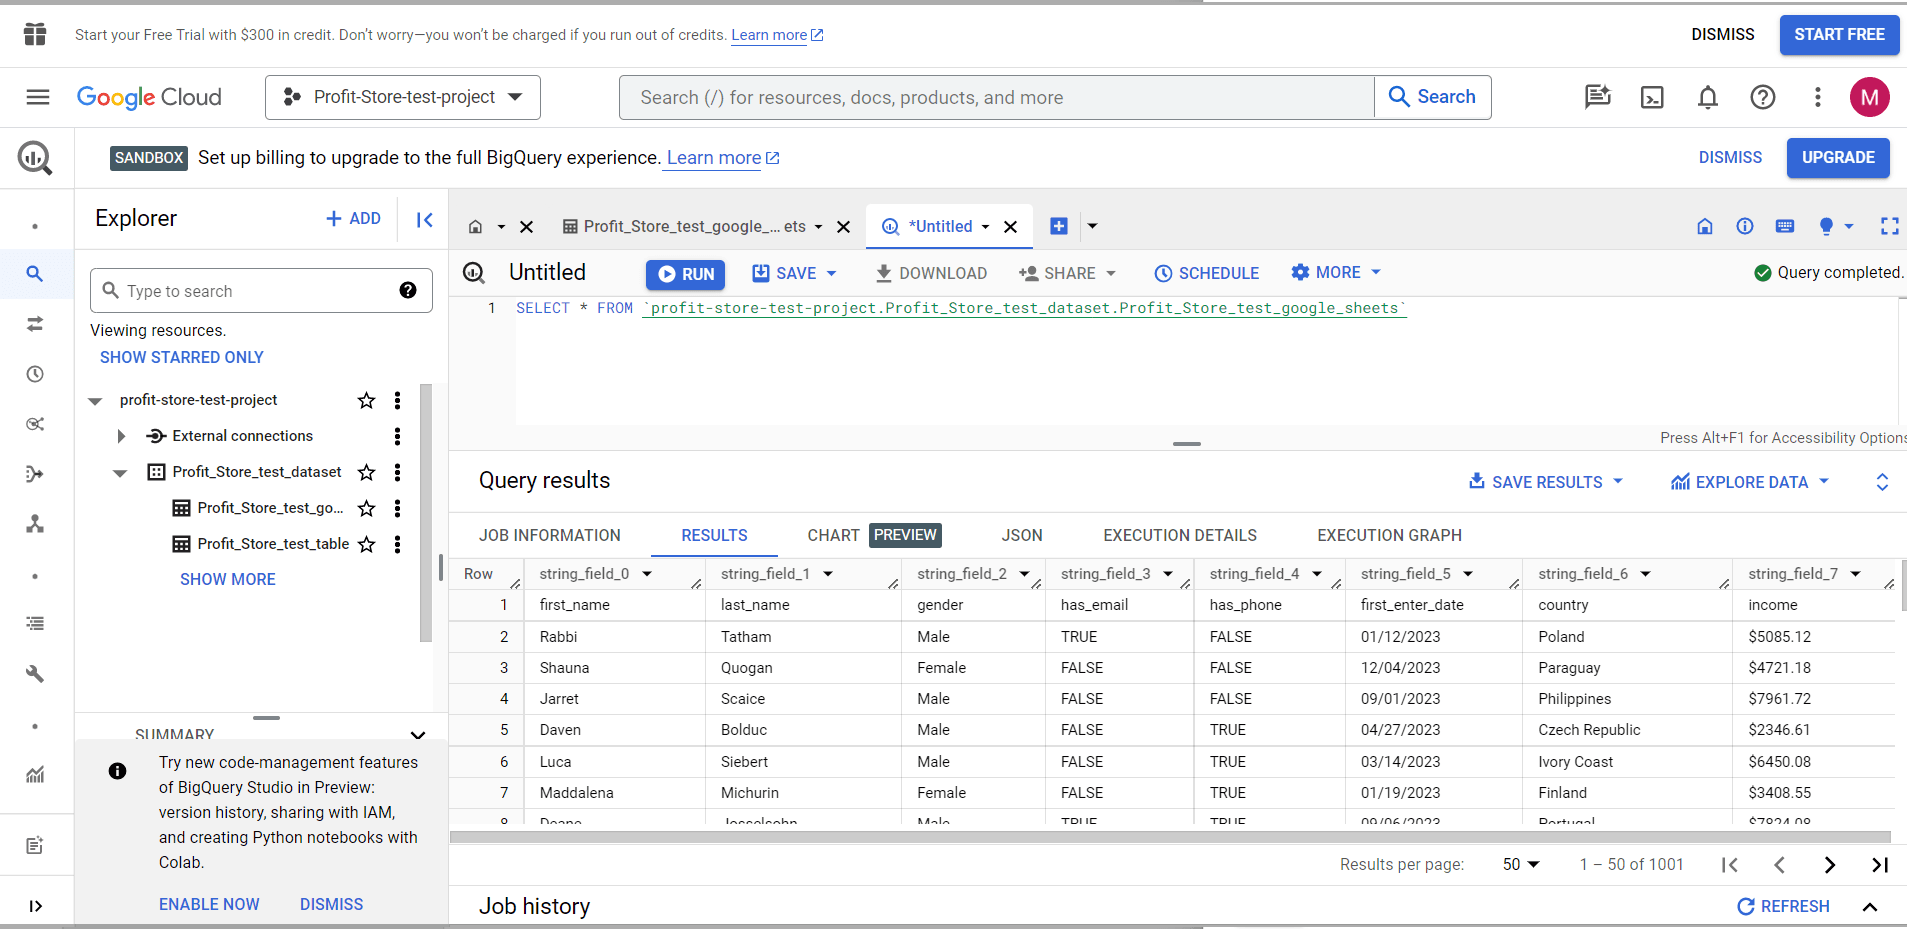
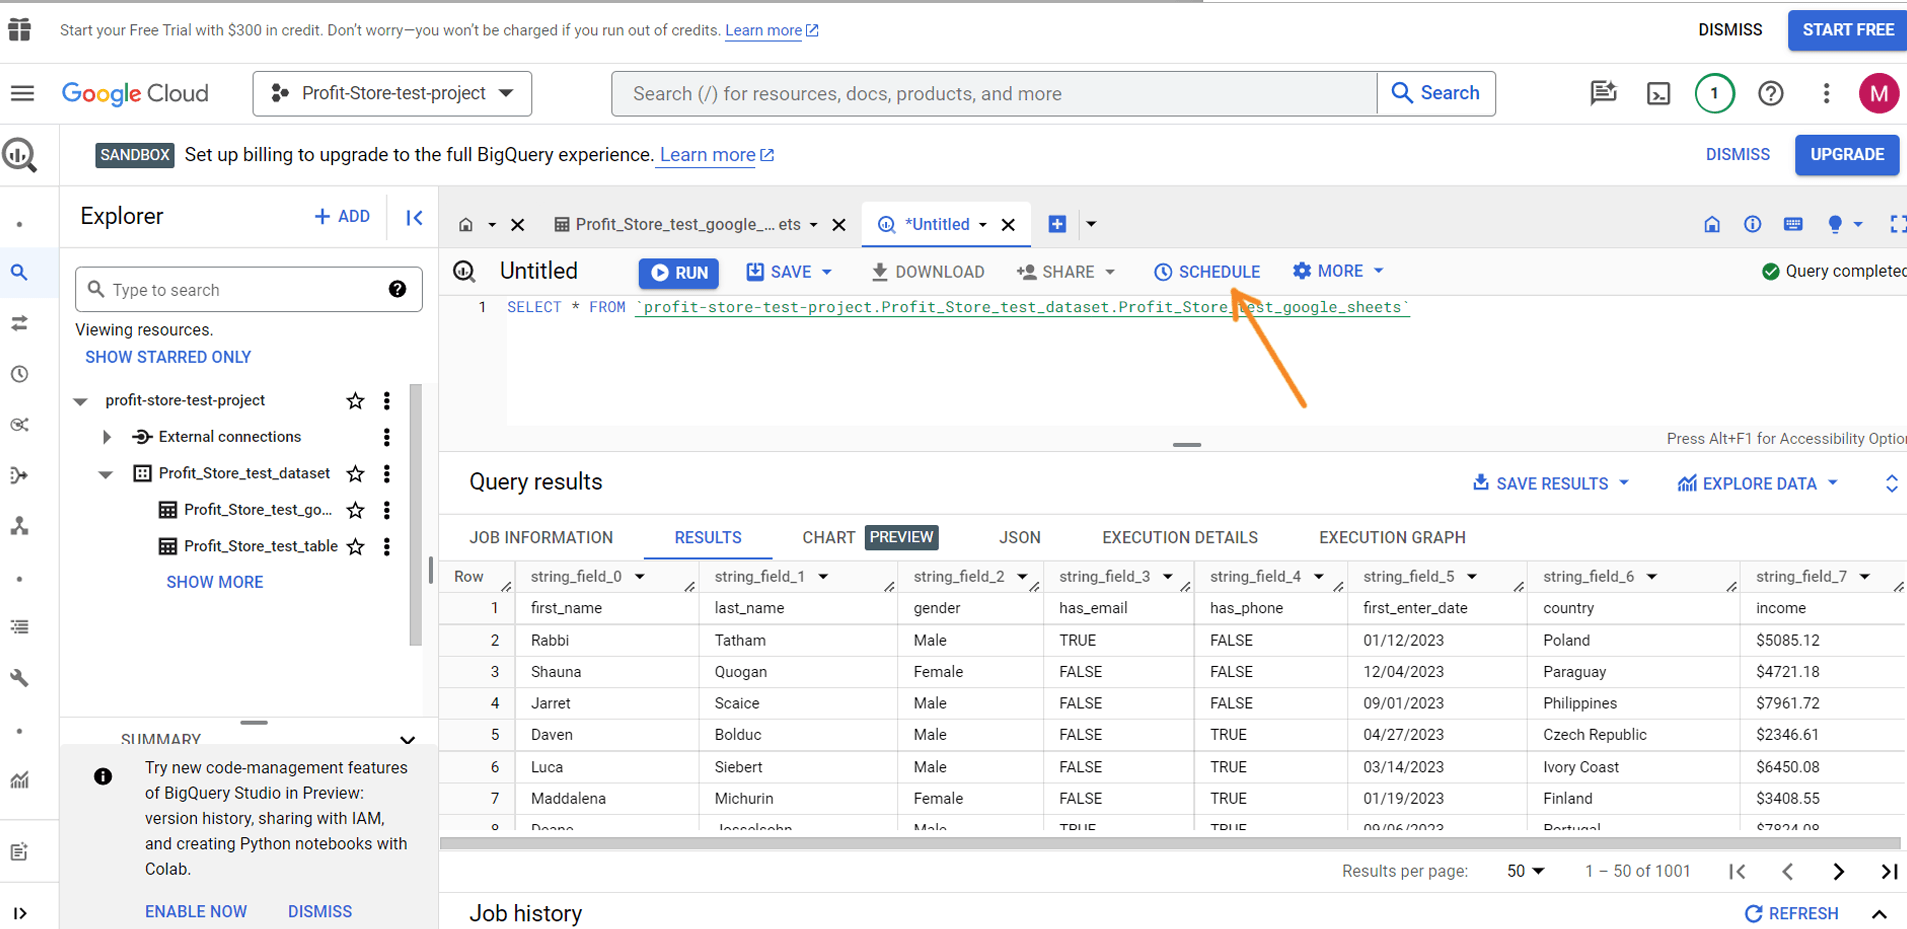
Next to the SAVE button, there is a SCHEDULE button that allows you to enable scheduled queries.
Why enable scheduled queries:
- Queries can be huge and take a long time to complete, so it's best to prepare your data in advance.
- Google charges a fee for data queries, so if you can update your data on a daily basis, it's best to do so and use the pre-prepared views to query them separately.
Note. Request scheduling is only available for projects with invoicing enabled. It does not work for SANDBOX account projects.
After clicking the "SCHEDULE" button, you will receive a message that you must first enable the BigQuery Data Transfer API.
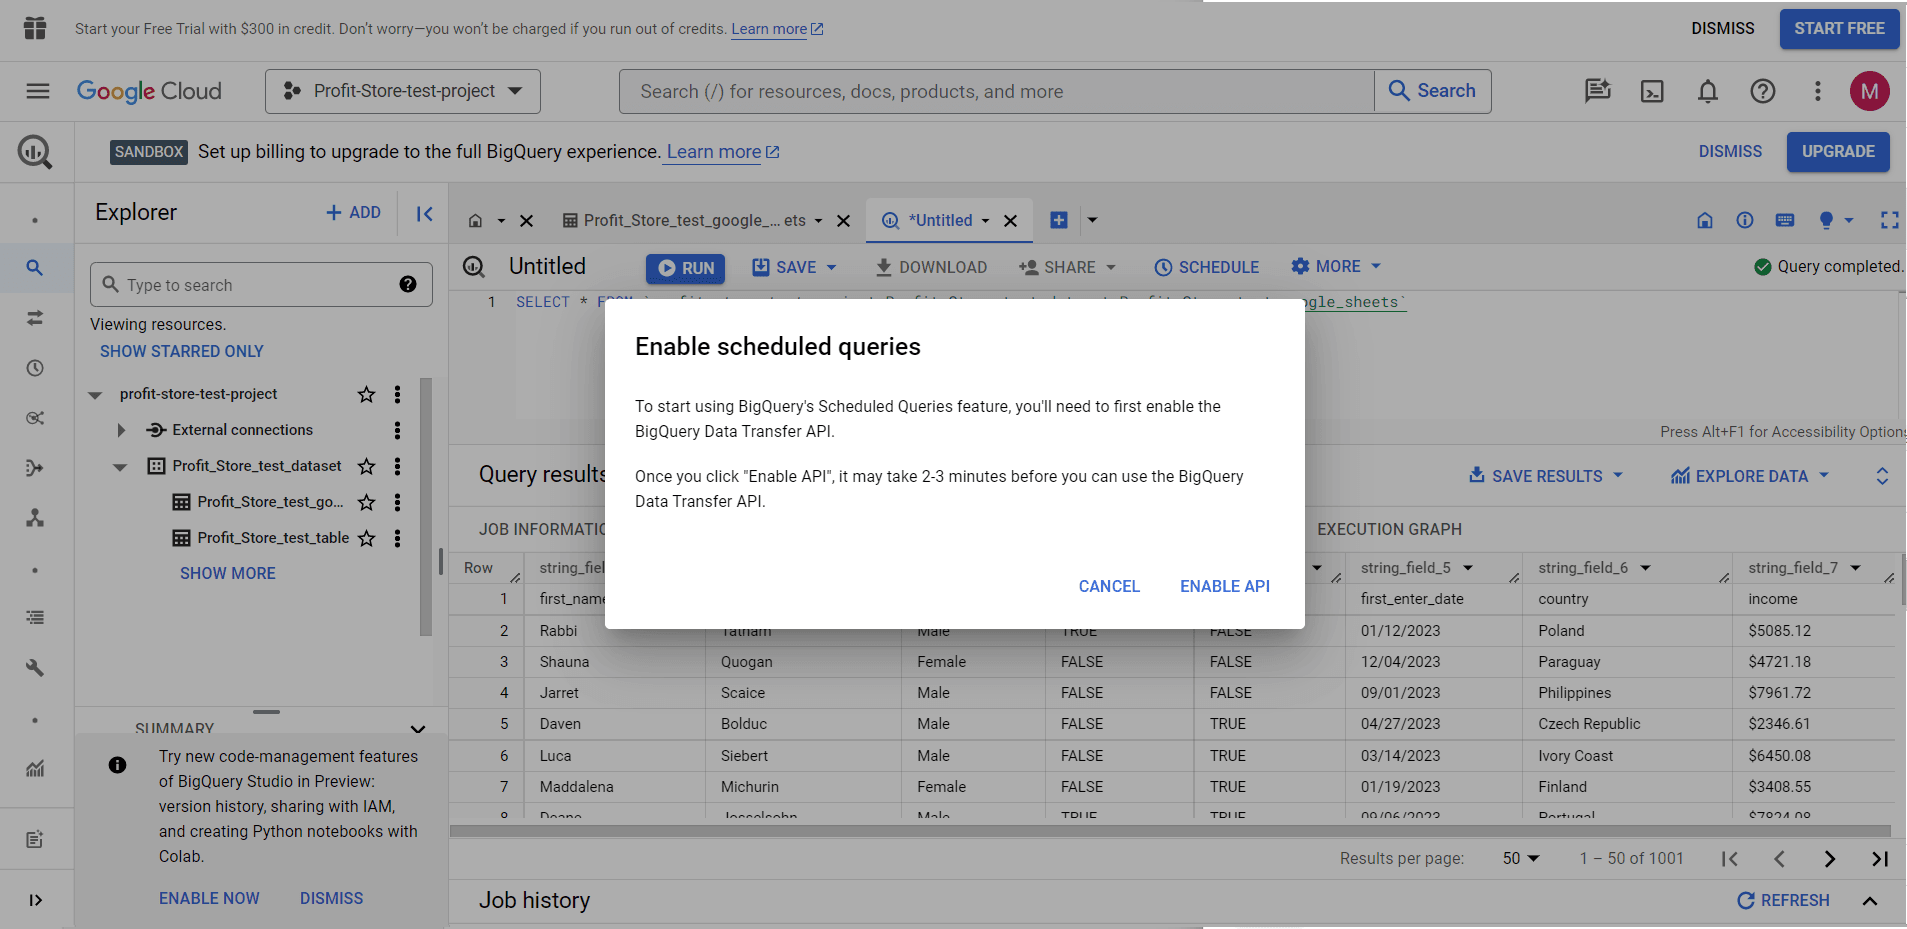
Click 'ENABLE API' and wait. You can then create scheduled requests by clicking the 'SCHEDULE' button.
Click Create New Scheduled Query to create a new scheduled query and set the following parameters
- Name of the scheduled request
- Schedule options
- Repetition
- Start date and working hours
- End date
- Destination
- Table name
- Record preferences (overwrite or add)
- Overwrite - the query results will overwrite the data in the table
- Add - the query results will be added to the data in the table
If you wish, you can configure additional settings and notification options. When you're ready, click Schedule.
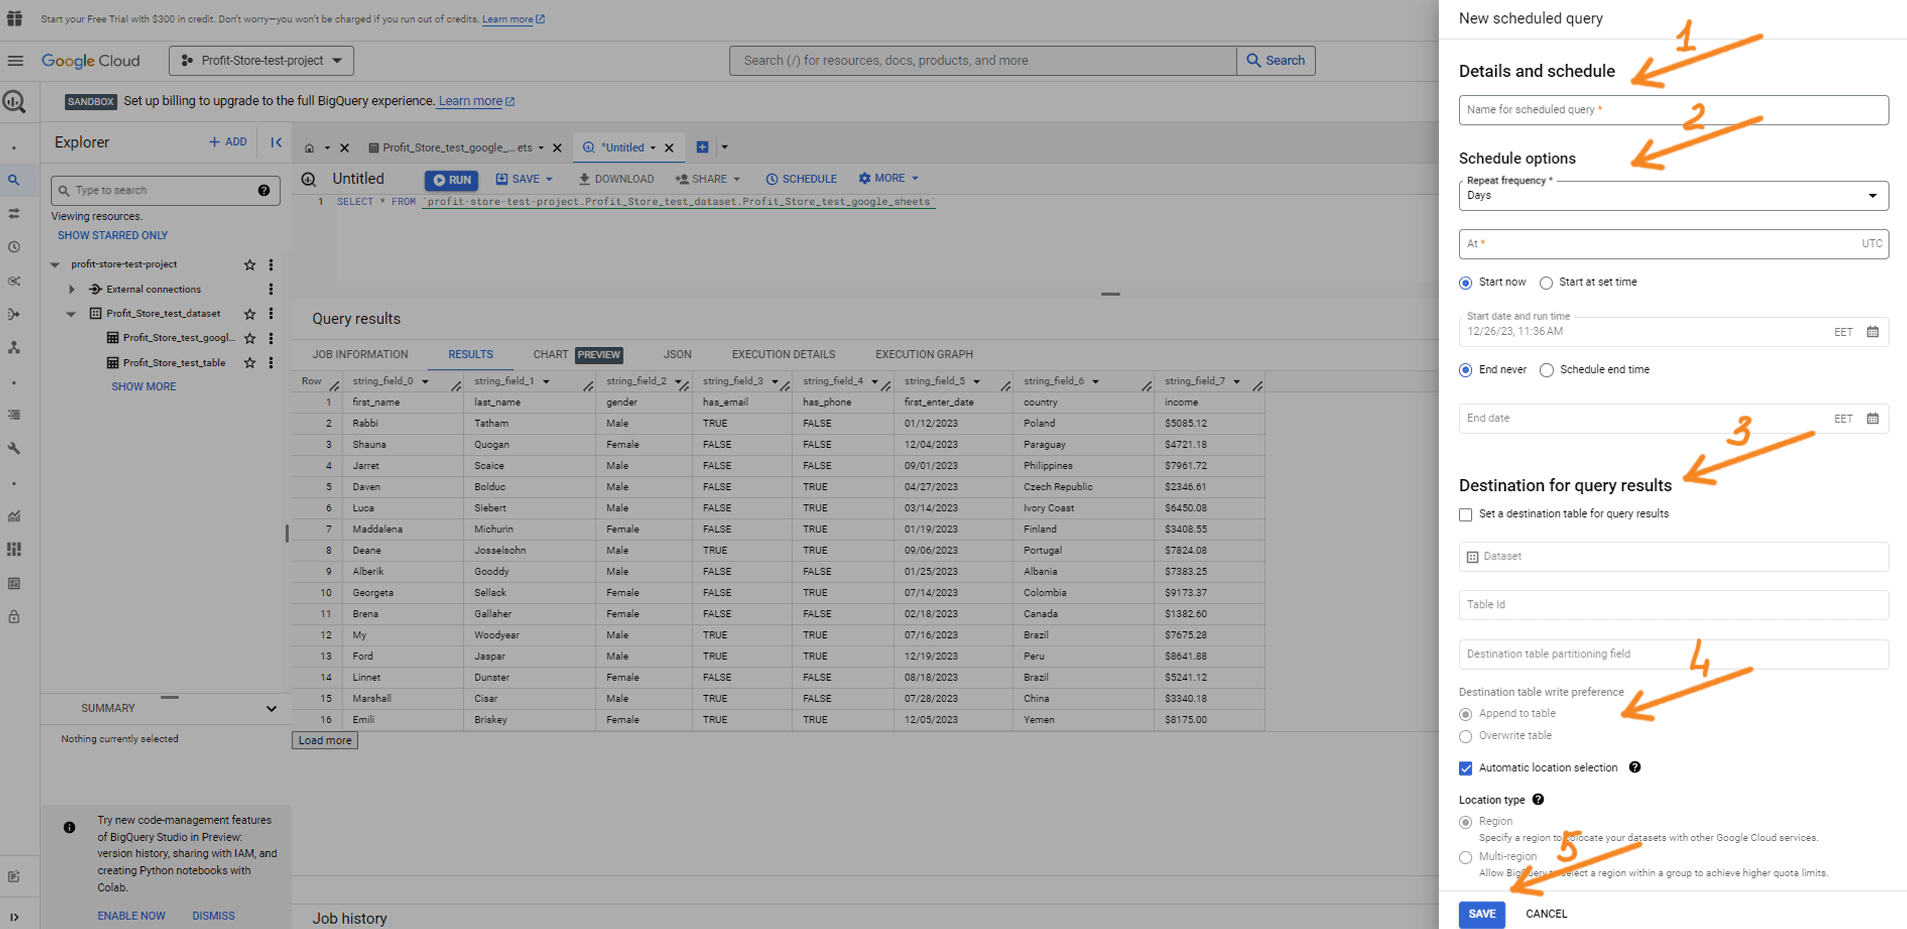
You will then need to select your Google Account to continue working with the BigQuery data service.
Query history
Let's say you forgot to save an advanced query and now want to restore it. BigQuery provides logs of completed queries and tasks. You can find them in the Job History or Query History pop-up tabs: "JOB HISTORY" and "QUERY HISTORY".
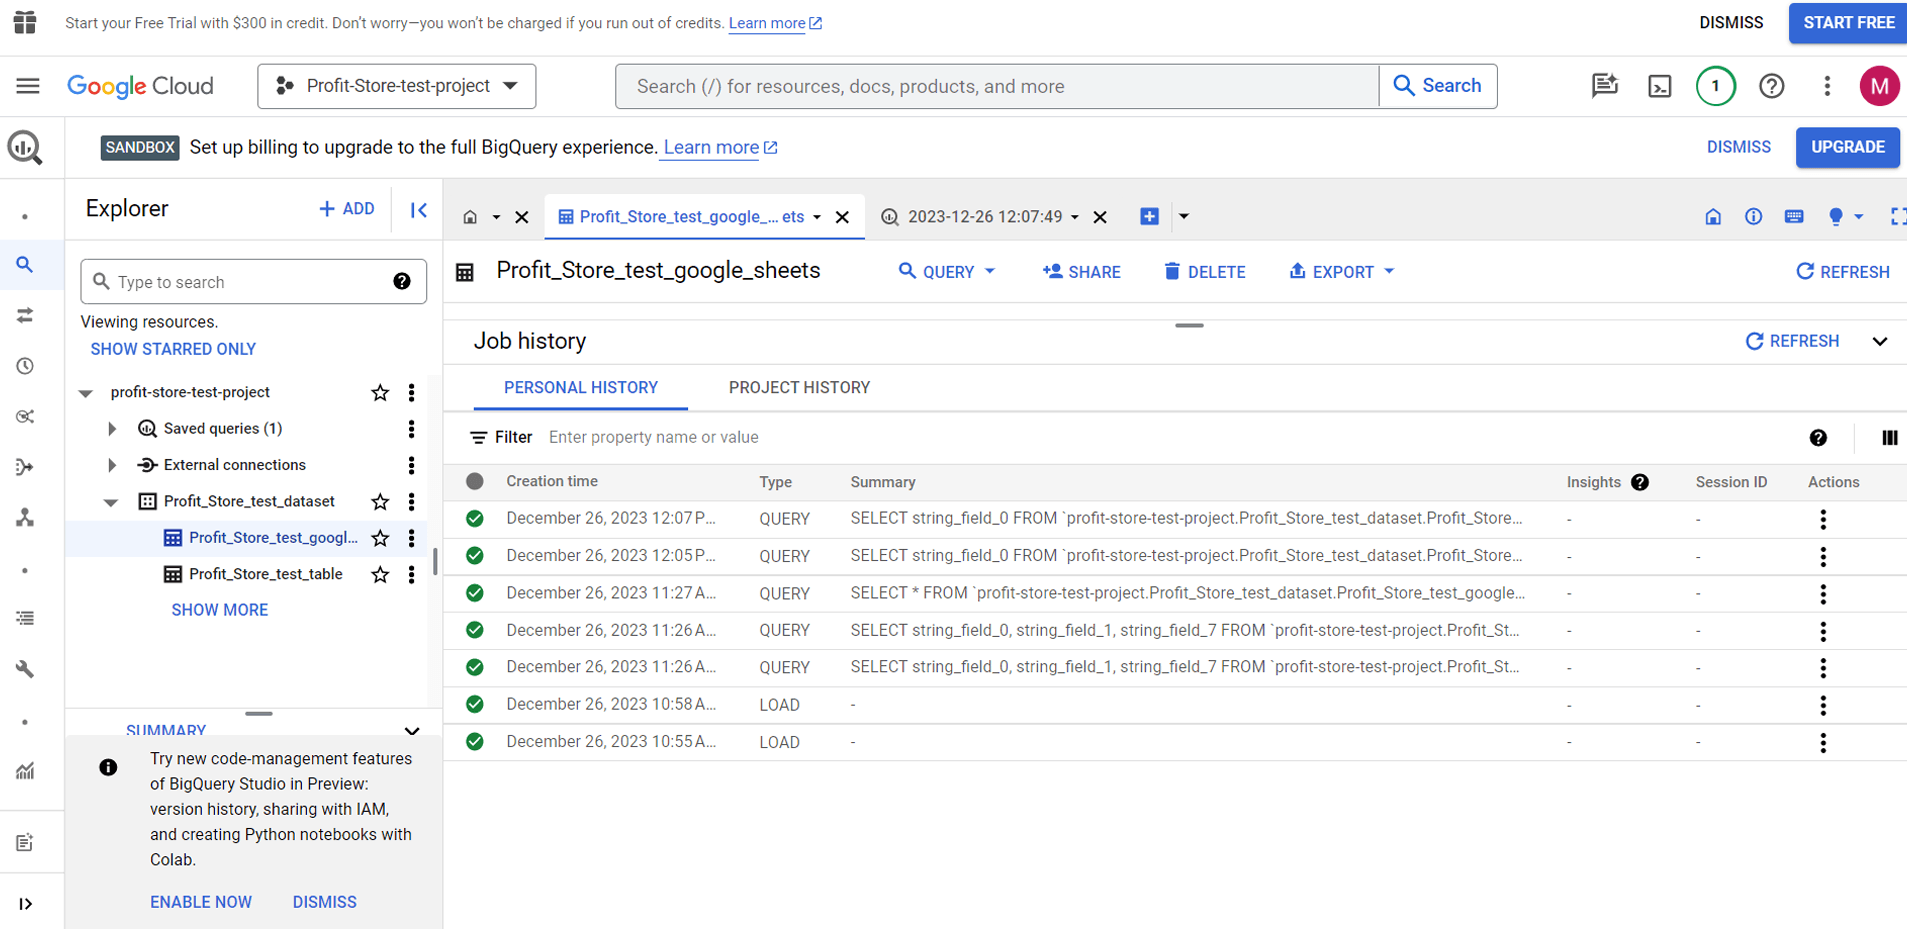
Note. BigQuery shows all load, export, copy and execute operations for the last six months. However, there is a limit to the number of job and query history records stored, which is 1000 records.
Exporting queries from BigQuery and transferring data to BigQuery
Users often need to transfer the results of their queries from BigQuery to other systems. This is often done using spreadsheet applications such as Google Sheets and Microsoft Excel, data visualisation and dashboarding tools such as Google Looker Studio and Tableau, and other software. You can also connect Power BI to BigQuery.
To export query results, click the SAVE QUERY RESULTS button and select one of the available options:
CSV file
- Download to your device (up to 16K lines)
- Download to Google Drive (up to 1 GB)
JSON file
- Download to your device (up to 16K lines)
- Download to Google Drive (up to 1 GB)
BigQuery table
- Google spreadsheets (up to 16K rows)
- Copy to clipboard (up to 16K lines)
As an example, let's choose the BigQuery table option. You will need to select a project and a dataset, and give the table a name.
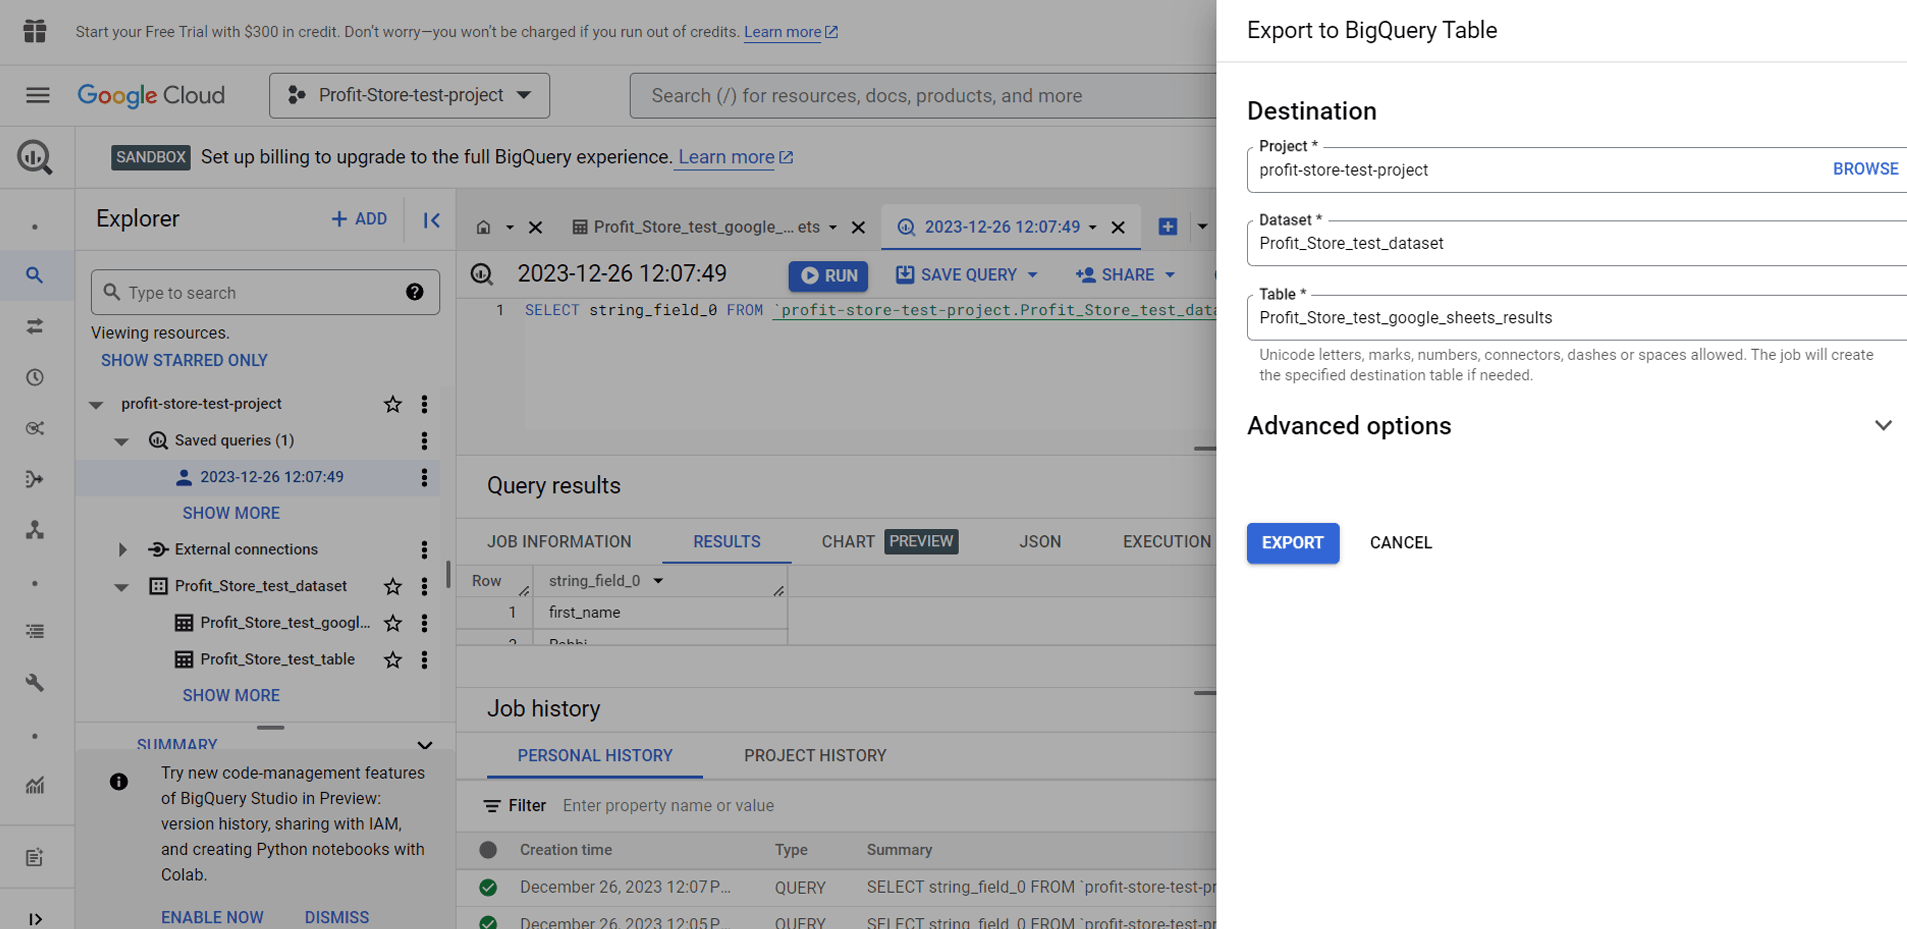
Click "SAVE" and you're done.
How BigQuery stores data
Unlike traditional databases, where data is stored in row order, BigQuery uses columnar data storage. This means that each column is stored in its own block of data. This storage format, known as a capacitor, provides BigQuery with high throughput, which is a key aspect of efficient online analytical data processing.
BigQuery Architecture
The BigQuery architecture keeps storage and compute resources separate. This allows you to load data, regardless of size, directly into the storage system and start analysing it immediately, without unnecessary delays or the need to pre-allocate compute resources.
Here are the infrastructure technologies that make this possible:
- Colossus is in charge of storage. Colossus is a global storage system that specialises in efficiently reading massive amounts of structured data. It also performs data replication, recovery and distributed management tasks.
- Dremel does the computing. It is a multi-tenant cluster that translates SQL queries into tree-like execution structures. These trees contain elements called "slots", which act as basic compute nodes. A user can have thousands of slots to execute queries.
- Jupiter plays a key role in BigQuery by providing fast data movement between the data warehouse (Colossus) and the computing system (Dremel). This system is a petabyte-scale network that can move large amounts of data from one place to another very efficiently and quickly, optimising the overall performance of BigQuery query processing.
- Borg is responsible for allocating hardware resources. It is a cluster management system for running hundreds of thousands of tasks in BigQuery.
SHARE
OTHER ARTICLES BY THIS AUTHOR
Get the most exciting news first!
Expert articles, interviews with entrepreneurs and CEOs, research, analytics, and service reviews: be up to date with business and technology news and trends. Subscribe to the newsletter!


