


Set up dynamic remarketing with GTM
With remarketing, you can use targeted ads to encourage potential buyers who have left a website without making a purchase to return and complete the transaction.
Google Ads offers a remarketing tool that shows ads to people who have previously visited a website. The uniqueness of dynamic remarketing lies in its ability to customise ads for specific categories or products that the user was interested in when visiting specific pages of the website. In addition, well-configured Performance Max campaigns are used for dynamic remarketing to bring back a significant number of visitors.
Dynamic remarketing tag in Google Ads and how to set it up
In order to run a dynamic remarketing campaign, you must first integrate special Google Ads tags into your website. Follow these steps to properly configure the tags to send data to your remarketing campaign:
- Sign in to your Google Ads account: Sign in to your Google Ads account.
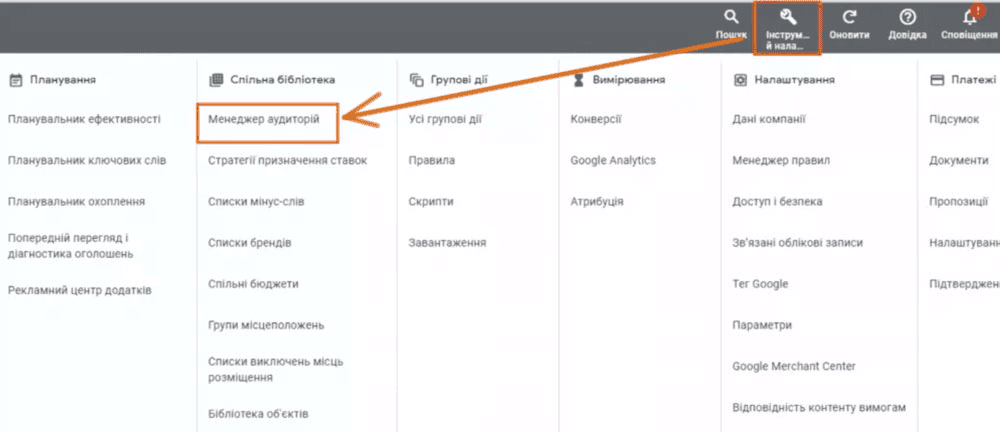
- Select the Tools & Settings section: In your Google Ads account, find and click the Tools & Settings icon, usually located in the top right corner of the interface.
- Go to the Audience Manager: From the Tools & Settings menu, select Shared Library and find Audience Manager in the Audience section.
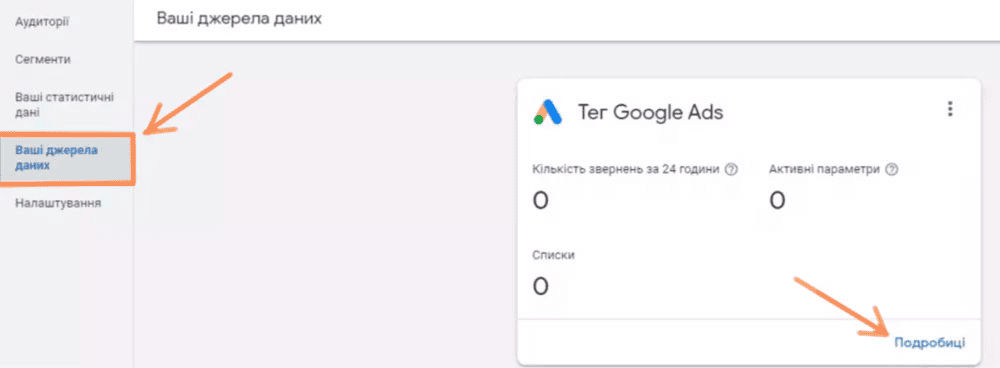
- Go to the 'Your data sources' section - 'Google Ads Tag' - 'Details
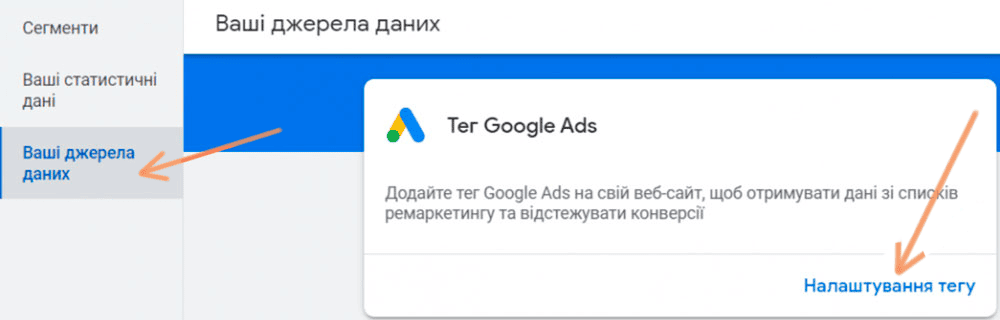
- Click 'Tag settings': If you have a new account, instead of the 'Details' button, you will see a 'Tag Settings' option. Click this button.
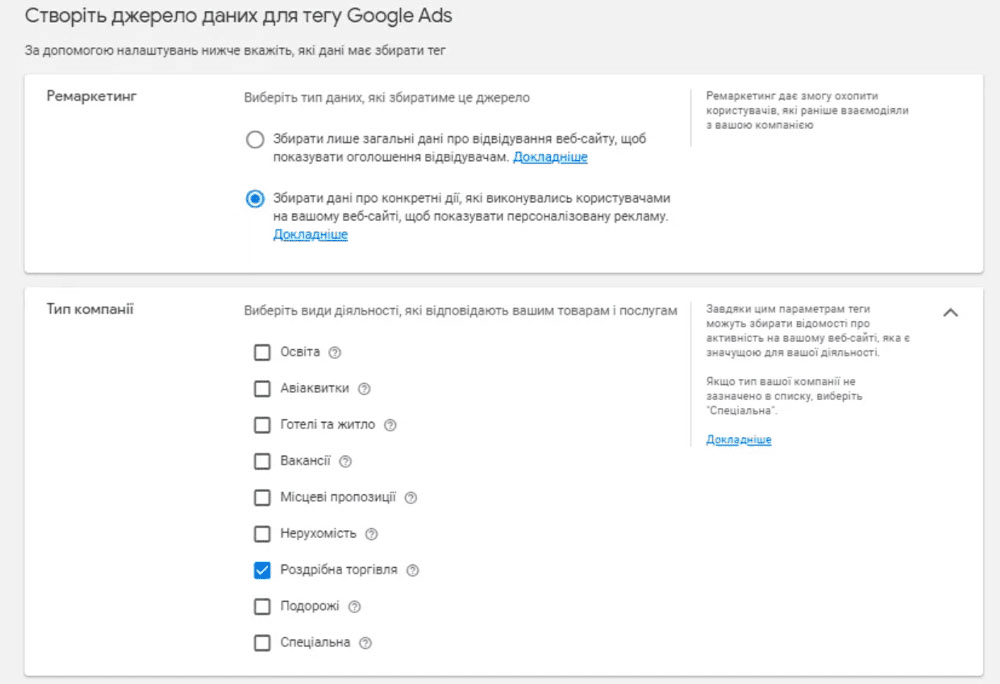
To set up the Google Ads Tag data source for new accounts, follow these instructions Select the options as shown in the screenshot. For example, if you are creating a remarketing campaign for an online store, select the appropriate options. These settings also apply to other business types, particularly in the Remarketing section. Select the business type that best reflects your business.
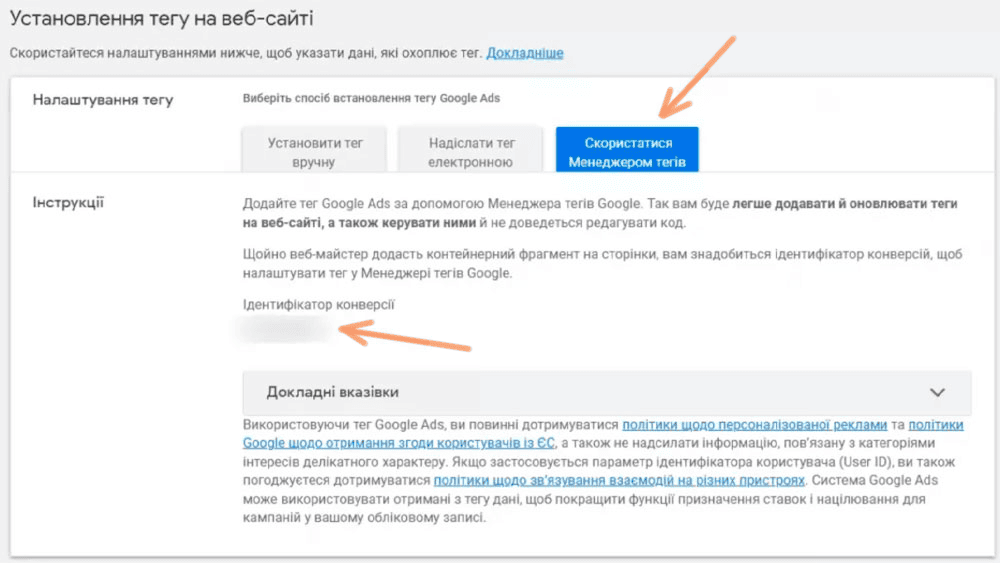
- You will then be redirected to the Google Ads tag settings menu. There are three different methods available to install it:
- set the tag manually;
- send the tag by email to the developer;
- Google Tag Manager.
Installing a tag manually requires some development skills. Let's focus on installing the tag using Google Tag Manager (GTM), as this method is easier to set up and requires less time and effort than a developer installing the code manually.
To use Google Tag Manager, you will need a conversion ID number during the tag installation process. Select the 'Use Tag Manager' option in the 'Set Tag on Website' window and copy the ID provided.
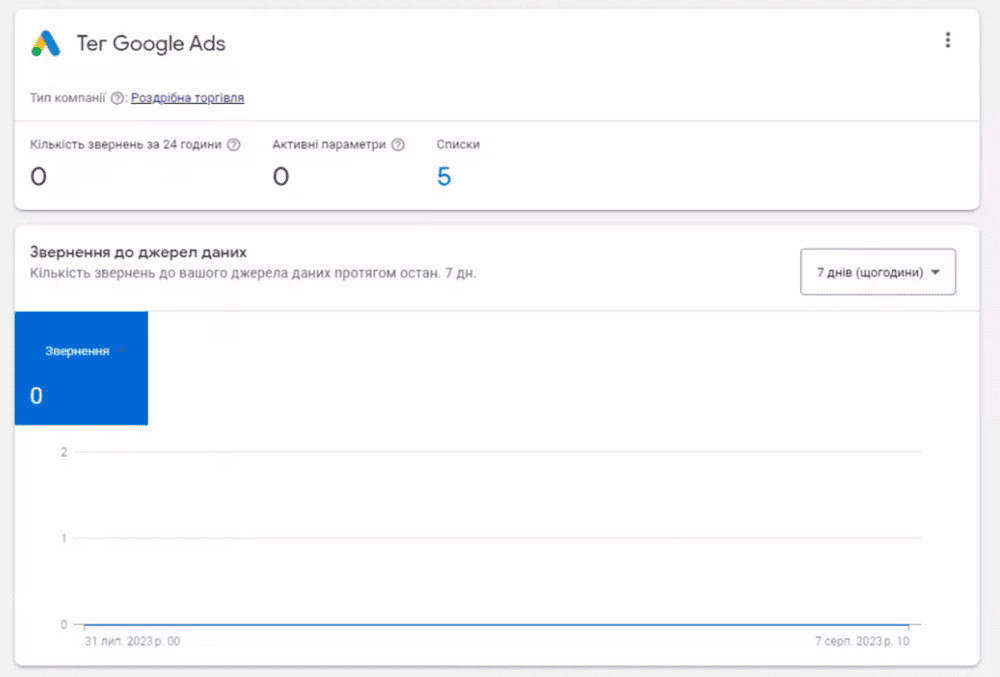
This completes your settings in Google Ads. After clicking the 'Next' button, you will be taken to the tag report. As the tag has not yet been set, the report will be empty.
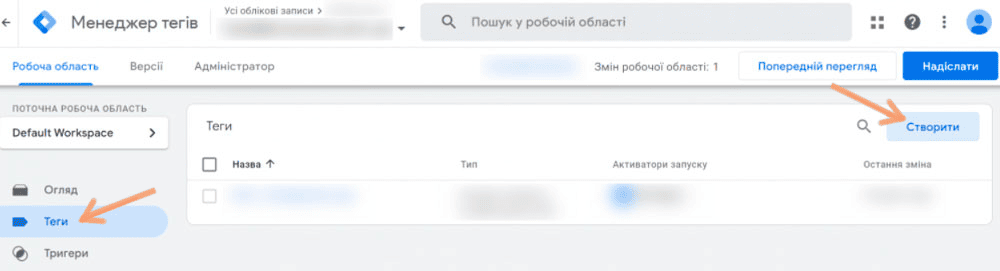
Creating a tag in GTM without setting a trigger to activate it
In this part of the process, we will create a tag without an activation trigger. This is to prevent you from accidentally publishing a tag that is not fully configured.
Go to the Google Tag Manager (GTM) and select 'Tags' and then 'Create'.
To do this, select the Tag option and then Google Ads Remarketing. Then add the conversion ID you copied from your Google Ads account.
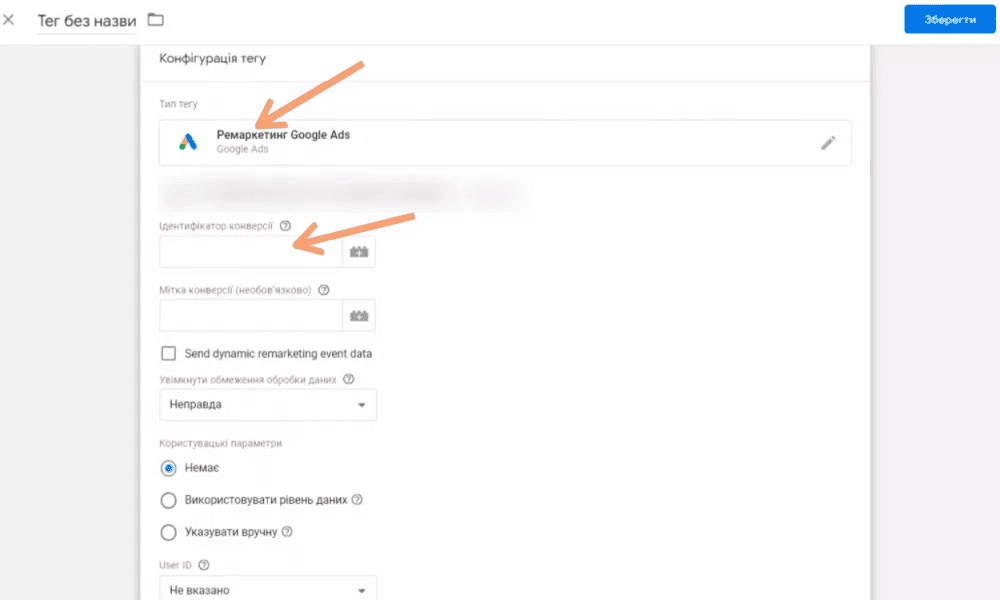
Save the tag in this form, but do not publish it.
In order to effectively set up dynamic remarketing tags using Google Tag Manager (GTM), it is important to first develop a detailed technical brief for your web developer. The developer's main task is to implement specific snippets of code on your website. These fragments, placed in the internal data layer, play a key role in tracking and transmitting information about user actions on the site. Dynamic remarketing ads are generated based on this data.
Currently, Google supports a limited number of event types that are identified by unique text identifiers. Each tag represents a specific type of data collected about user interactions on the site. These identifiers allow Google Ads to automatically match users to the appropriate default remarketing lists.
Google recommends that you use the standard event names listed in its official documentation.
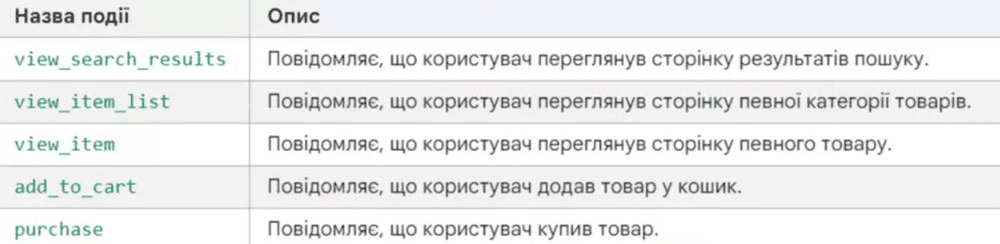
Each dynamic remarketing event is associated with specific parameters represented by a JavaScript object. This object contains detailed information about the selected event. The key element in this object is the items parameter, which must contain at least one item element. Each such item stores data about a specific product or service with which the user has interacted.
For flexibility, an additional "value" parameter can be included in the "item". This parameter represents the total cost of the goods.
When implementing the code to track dynamic remarketing events, it is necessary to ensure the transmission of at least one "item". In cases where a user interacts with multiple products or services, the system can process and transmit multiple such items. For example, when a customer adds multiple products to a shopping basket or searches for tickets to travel to different locations.
Item parameters for an online store
If you are setting up remarketing for an online store, we recommend that you include the following parameters in the item object. It's important to remember that the specific set of parameters you use may vary depending on the specific goals of your campaign. Each parameter in the item should play a role in ensuring the accuracy and effectiveness of the remarketing campaign.
id - a unique identifier for the item.
This attribute is critical: it must exactly match the id or item_group_id used in your Google Merchant Center product feed.
value - the total cost/price of the products.
google_business_vertical - feed type, for an online store - "retail".
Recommendations for implementing dynamic remarketing code
The purpose of this section is to provide clear and detailed instructions for developers to implement specialised Google Ads dynamic remarketing codes on your website. These codes are designed to effectively track user interactions on the website, which is key to creating targeted advertising campaigns. It is important to ensure that every aspect of the integration is done in accordance with Google's technical standards and business specifics.
To effectively implement remarketing codes on your website, it is important to provide a clear and detailed Technical Terms of Reference (ToR) for the developer.
The main content of the ToR for the integration of Google Ads dynamic remarketing codes should include the following aspects
- Define the events, their names and when they should be delivered.
- The specific code to be implemented.
- Any additional information that may be required for clarification or specification.
To give you a clear understanding of what the terms of reference (ToR) for implementing Google Ads dynamic remarketing codes should look like, here are sample ToRs for each of the four key events offered by Google.
Viewing the product catalogue page
The code should be configured to be triggered when products are loaded on the page of a particular category.
For example, if you navigate from the home page to the Cases category and then to the iPhone 15 Case sub-category, the code should be triggered when you view all the products in that sub-category.
window.dataLayer = window.dataLayer || [];
dataLayer.push({
'event': 'view_item_list', // The name of the event. Leave it unchanged.
'value':1.455, // We will transfer the total value of all uploaded goods
'items': [
{
'id': 1002515 , // We transmit the ID of all uploaded goods
'google_business_vertical': 'retail' // We leave it unchanged
},
]
});

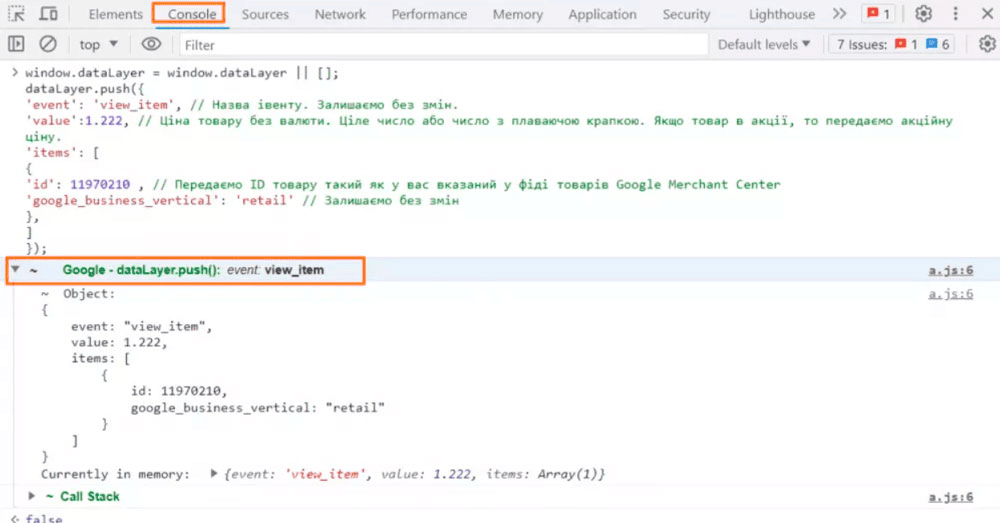
View product
The code must be triggered when the product card is loaded.
Example:
window.dataLayer = window.dataLayer || [];
dataLayer.push({
'event': 'view_item', // The name of the event. Leave it unchanged.
'value':1.455, // The price of a product without currency. A whole number or a number with a floating point.
If the product is on sale, we will pass on the promotional price.
'items': [
{
'id': 1002515 , // Pass the product ID specified in the Google Merchant Centre feed
'google_business_vertical': 'retail' // We leave it unchanged
},
]
});
To make sure the code is correct, open the console in a browser using the F12 key or Fn+F12 combination, paste the code and press Enter. This will give the following results.
Transaction
The code should be executed when the user completes the transaction and is redirected to the order thank you page.
To work correctly, the code must meet the following criteria
- The code should only be activated once each time the page is opened.
- The code should not be re-activated after the page is reloaded.
- In the case of a transaction through the payment system, the user is automatically redirected to the thank you page for the order, where the code should be activated.
window.dataLayer = window.dataLayer || [];
dataLayer.push({
'event': 'purchase', // The name of the event. Leave it unchanged.
'value':1.455, // We transfer the total cost of all goods purchased
'items': [
{
'id': 1002515 , // We transmit the ID of all uploaded goods
'google_business_vertical': 'retail' // We leave it unchanged
},
]
});
Add a product to your basket
The code should be activated when the user adds an item to the shopping basket.
window.dataLayer = window.dataLayer || [];
dataLayer.push({
'event': 'add_to_cart', // The name of the event. Leave it unchanged.
'value':1.455, // The price of a product without currency. A whole number or a number with a floating point.
If the product is on sale, we will pass on the promotional price.
'items': [
{
'id': 1002515 , // Pass the product ID specified in the Google Merchant Centre feed
'google_business_vertical': 'retail' // We leave it unchanged
},
]
});
Key steps for completing your configuration in Google Tag Manager
Once you have successfully installed the codes on your website, start the tag configuration process in Google Tag Manager.
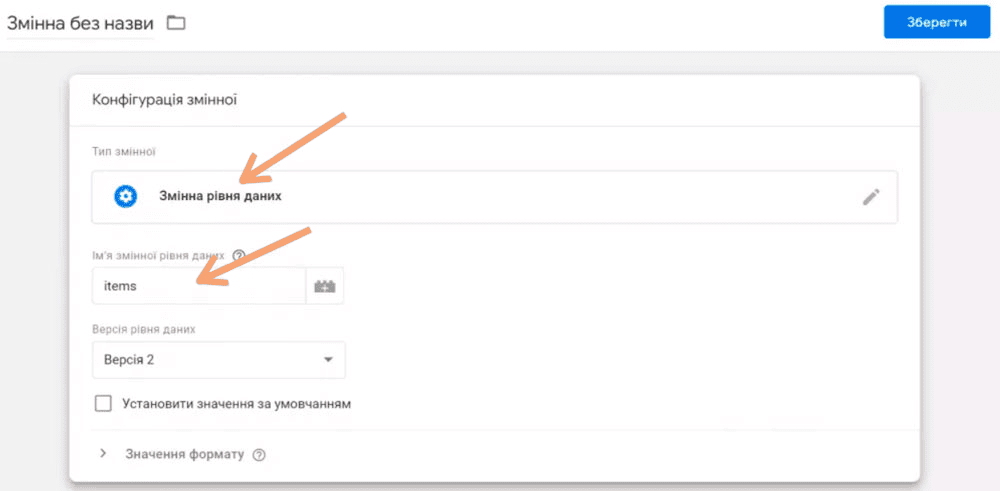
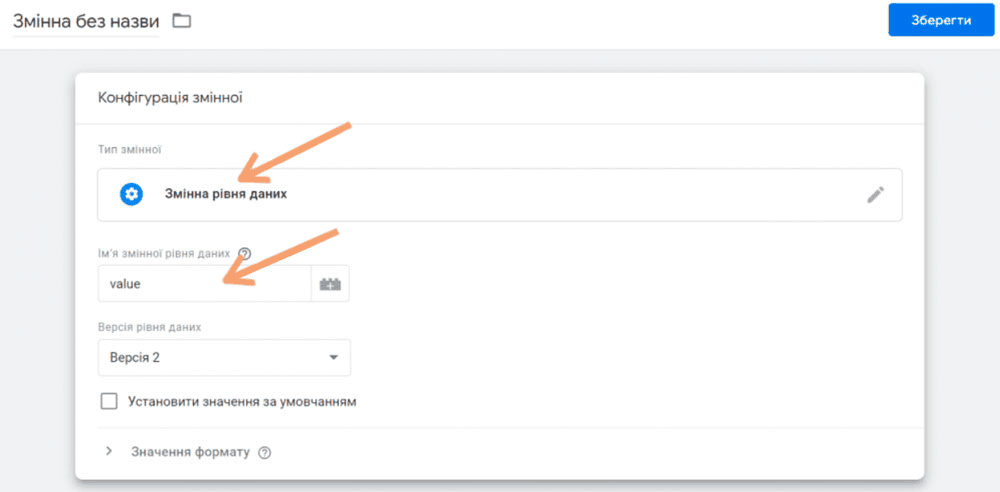
- Go to the Variables section, select the Custom Variables option, and then click Create.
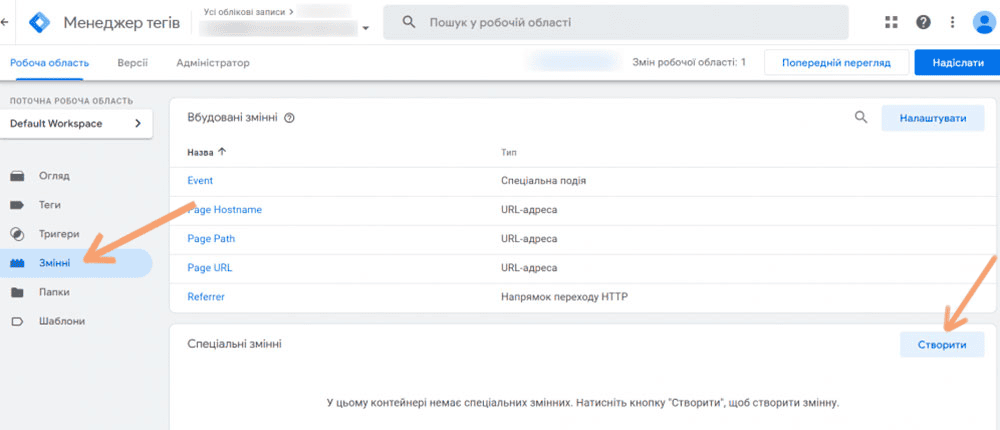
- Create two variables items and value.
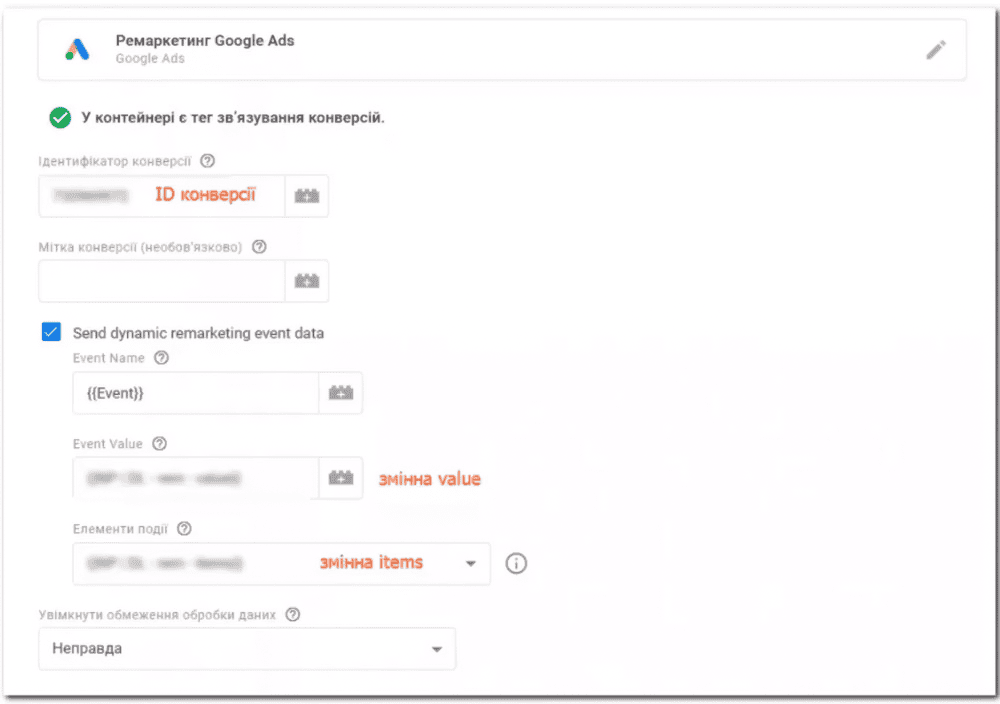
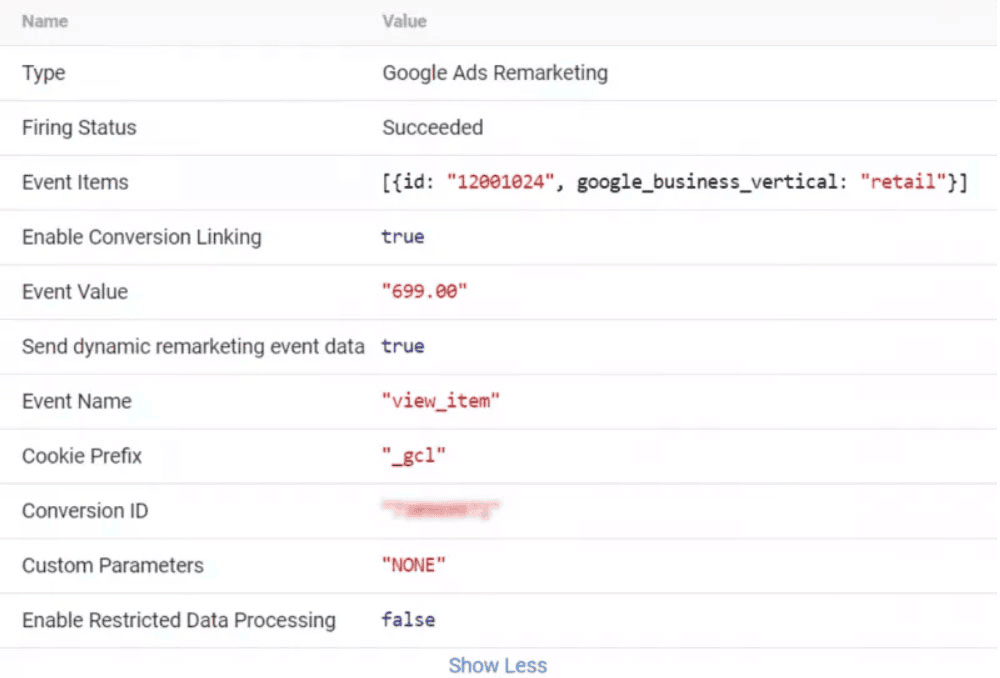
- Go back to the Google Ads Remarketing tag settings and enable the 'Send dynamic remarketing event data' option.
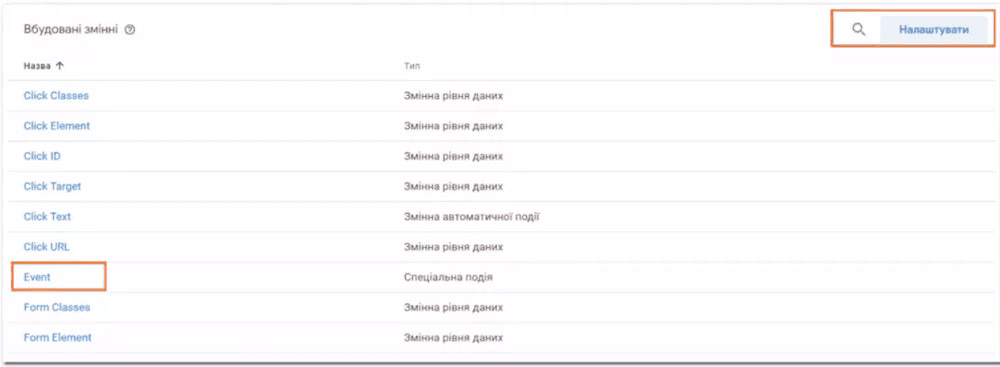
In the 'Event name' field, enter the default 'Event' variable that is already configured in Google Tag Manager (as shown in the image below). In the 'Event value' field, use the 'value' variable. In the 'Event items' field, add the 'items' variable.
To add the default 'event name' variable in Google Tag Manager, check that it is available in your list of variables. If you don't see it, enable it through the settings in the top right corner of the screen.
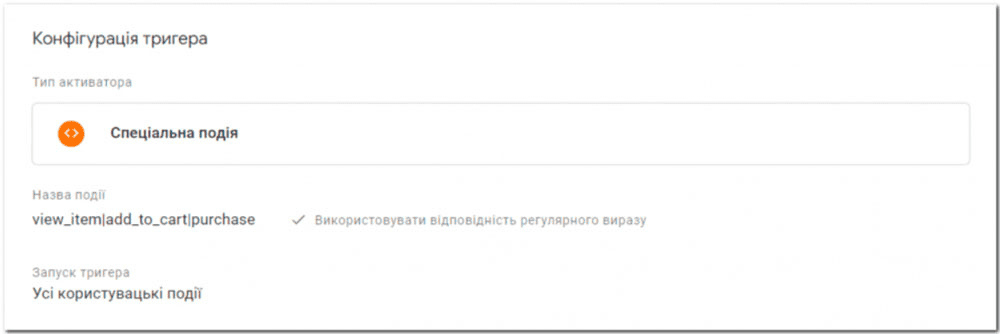
- Once the settings are complete, proceed to create a trigger to activate your tag. Tick the 'Use regular expressions' option and enter the names of all the events you want to track, separating them with a '|' character. This will allow the trigger to react to each of these events.
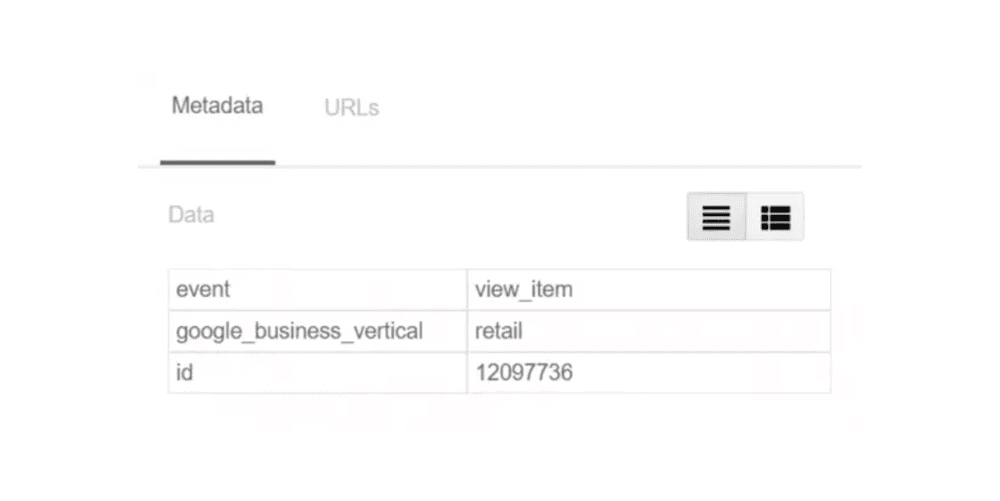
- To check that the settings are correct, you will need to go through all the events you want to track. Use the Google Tag Manager (GTM) debugger and Tag Assistant to analyse how the system responds to each event. If the test is successful, you will see the corresponding changes and a notification that the tag has been enabled, similar to the example of a successful test result for the 'view_item' event.
Creating audiences in Google Ads
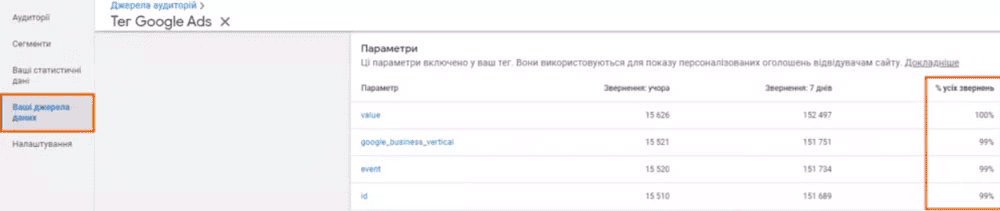
Once you have set up your tags, you can check their effectiveness in Google Ads. In the 'Your data sources' section, select 'Google Ads tag' and you will see statistics for the parameters you have selected. Pay particular attention to the "% of all queries" indicator. The ideal value for this parameter is between 99 and 100%. If the percentage is lower, this may indicate problems with data processing or incomplete coverage of all requests with tags. In this case you may need to check and adjust the tagging settings.
In the Audience Manager, Segments subsection of Google Ads, new audiences will automatically appear based on the tags you set up. These audience segments are created based on the data you collect and the behaviour patterns of users on your website. You can use these audiences to create more targeted and effective advertising campaigns by tailoring your ads to the needs and interests of different groups of users.
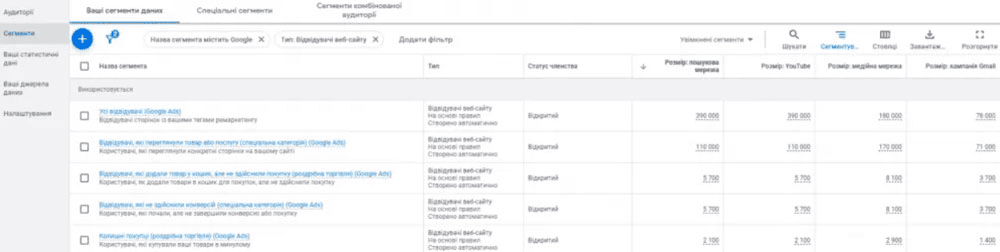
To create your own audience in Google Ads, go to the Segments section and select Website Visitors.
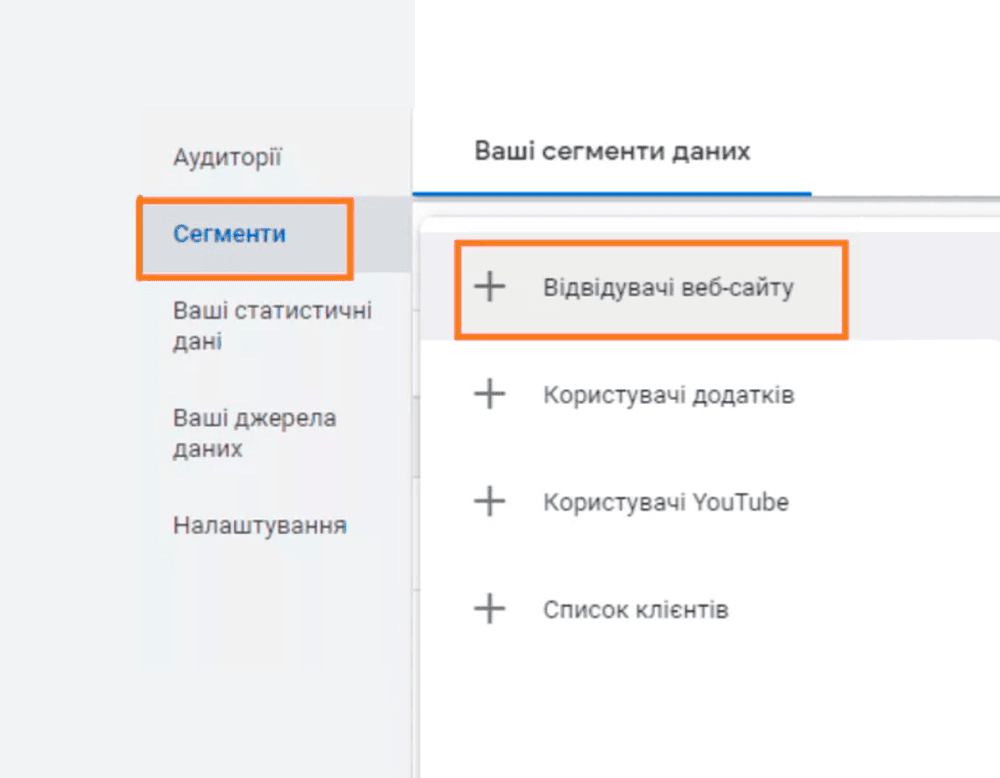
From the Action menu, select a specific event that matches your prospect's criteria or interests. Once you have selected an event, use the Event Builder to set additional parameters.
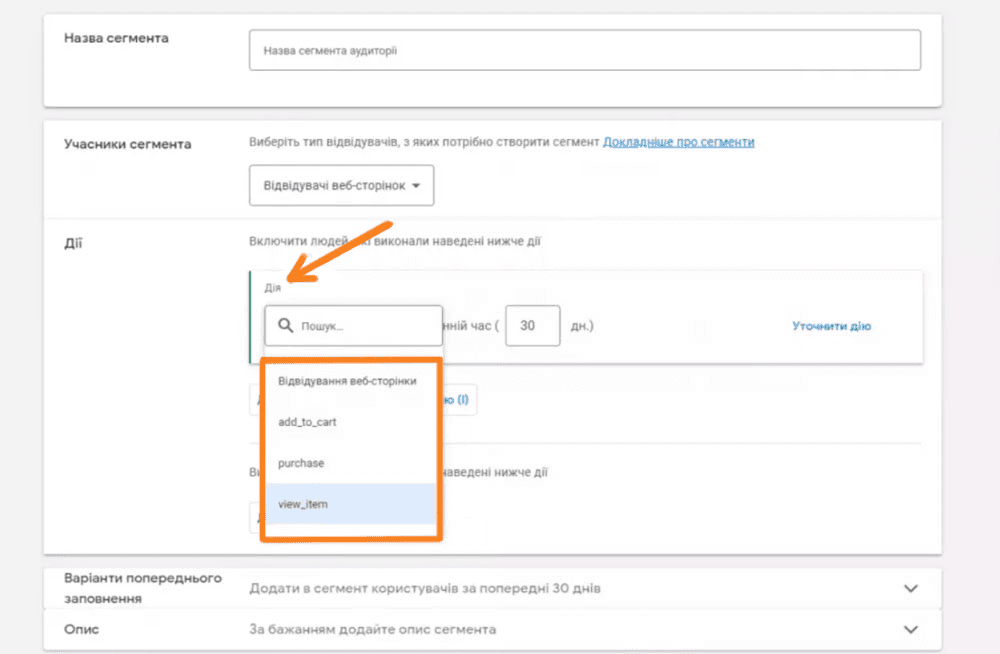
When you create an audience in Google Ads, the approximate size of that audience is estimated based on activity on your site over the past 30 days. It is important to understand that the accuracy of this estimate can vary depending on a number of factors:
- List settings: Specifying audience parameters such as age, interests, site behaviour, etc. can affect the size of your audience.
- The amount of time since the tag was installed: If the tag has been installed recently, historical data may be limited, affecting the accuracy of the audience size estimate.
Conclusion
Using Google Ads in conjunction with Google Tag Manager opens up significant opportunities for ad personalisation that can significantly increase the effectiveness of your marketing strategy. Here are some key points:
- Targeted remarketing: Your most valuable leads are those who have already shown interest in your products or services. With dynamic remarketing, you can reach these individuals repeatedly, reminding them of the brand and offering relevant products or services.
- Personalise advertising: Using the data collected on site behaviour, you can tailor advertising campaigns to the specific interests and needs of visitors.
- Increase return on advertising: Through more precise targeting and personalisation, advertising campaigns become more effective, increasing the chances of converting leads into customers.
- Optimise advertising costs: Precise targeting and remarketing can reduce the cost of acquiring new customers by investing in an audience that is already interested in what you have to offer.
Overall, the integration of Google Ads and Google Tag Manager allows you to create comprehensive and effective marketing strategies focused on converting website visitors into loyal customers.